The initial chapters of this tutorial were dedicated solely to HTML. Now, it's the moment to add some visual appeal (to some extent) with Cascading Style Sheets (CSS). You can perceive CSS as the tool that defines the "visual aesthetics" of a web page. It governs aspects such as font size, margins, and colors, employing a distinct language entirely separate from HTML.
Why is CSS considered a distinct language? It serves an entirely distinct purpose. HTML represents the content of your web page, while CSS dictates the manner in which that content is presented to the user. This fundamental differentiation is at the core of contemporary web development.
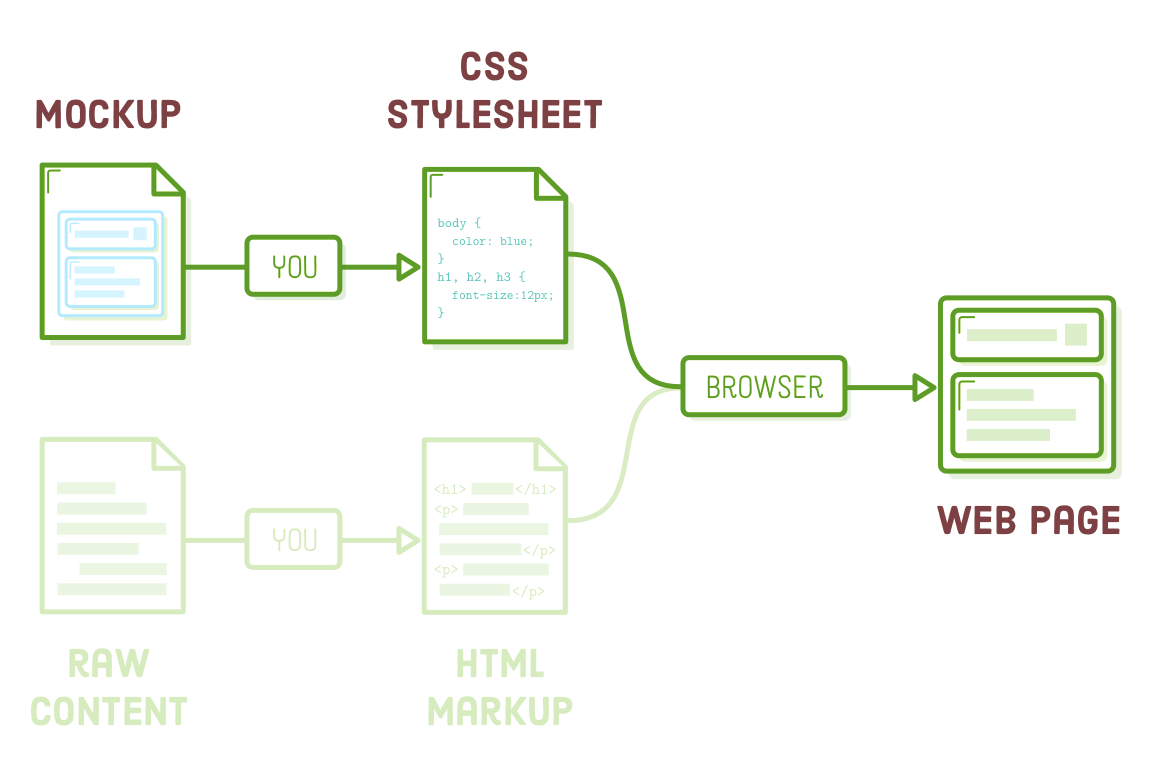
CSS furnishes the terminology to instruct a web browser with statements such as, "I desire my headings to be substantially larger, and I want my sidebar to be positioned on the left of the main article." HTML lacks the vocabulary to make these types of layout choices; its role is limited to identifying elements like "heading" and "sidebar."
In this chapter, we will delve into the fundamental structure of CSS and learn how to integrate it with our HTML documents. The aim here is not necessarily to become a CSS guru or commit all available styles to memory but, instead, to grasp the interaction between CSS and HTML. CSS is usually stored in a separate file, which is why, as in the previous chapter, maintaining an organized file structure will be of utmost importance.
Setup
To maintain simplicity, we'll store the examples for each chapter of this tutorial in distinct folders. Using your preferred editor, establish a new project folder named "hi-css." Since we'll be applying styles to an existing page titled "hi-css.html," please create that file and include the following markup:
<!DOCTYPE html>
<html lang='en'>
<head>
<meta charset='UTF-8'/>
<title>Hi, CSS</title>
</head>
<body>
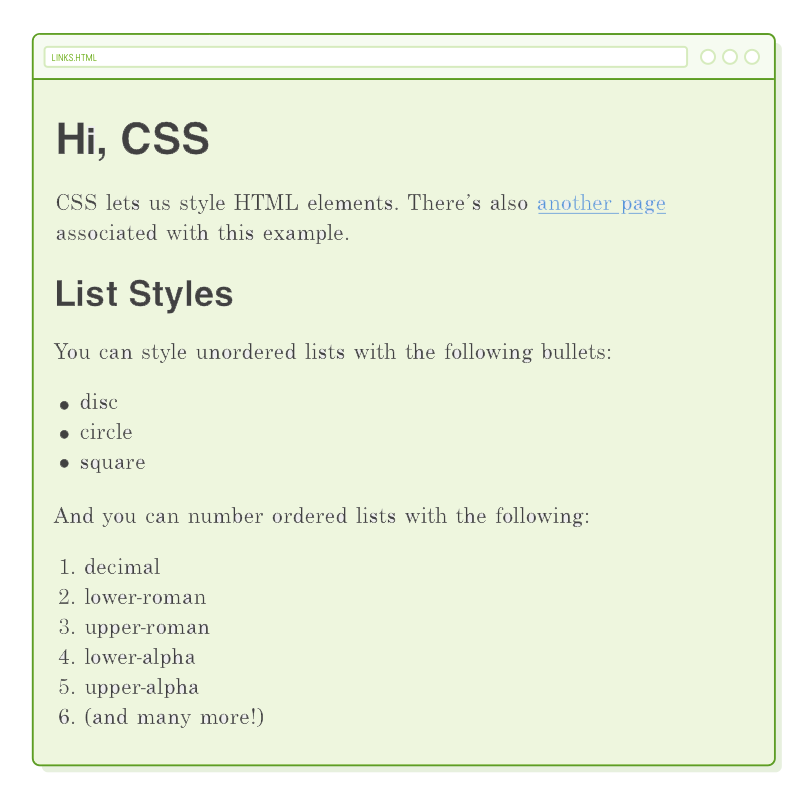
<h1>Hi, CSS</h1>
<p>CSS lets us style HTML elements. There’s also
<a href='dummy.html'>another page</a> associated with this example.</p>
<h2>List Styles</h2>
<p>You can style unordered lists with the following bullets:</p>
<ul>
<li>disc</li>
<li>circle</li>
<li>square</li>
</ul>
<p>And you can number ordered lists with the following:</p>
<ol>
<li>decimal</li>
<li>lower-roman</li>
<li>upper-roman</li>
<li>lower-alpha</li>
<li>upper-alpha</li>
<li>(and many more!)</li>
</ol>
</body>
</html>
Furthermore, we'll require a simple placeholder page to demonstrate how CSS styles can be employed across multiple web pages. Generate a file named "dummy.html" and insert the following content:
<!DOCTYPE html>
<html lang='en'>
<head>
<meta charset='UTF-8'/>
<title>Dummy</title>
</head>
<body>
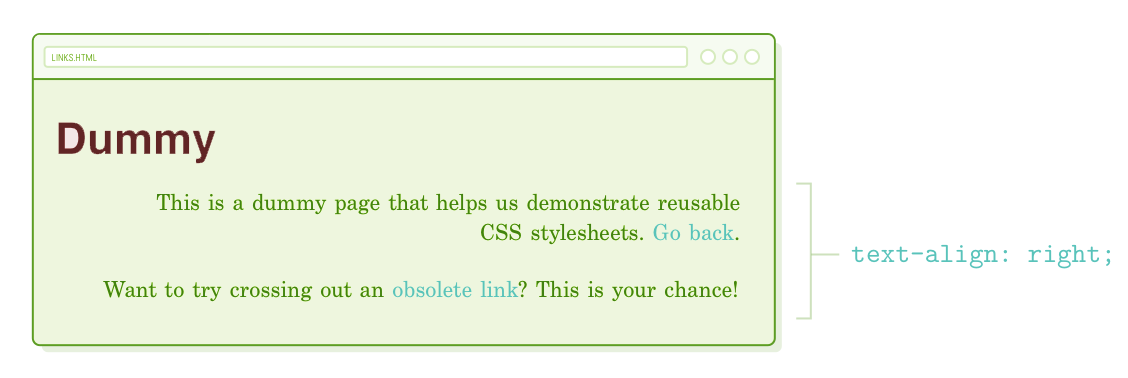
<h1>Dummy</h1>
<p>This is a dummy page that helps us demonstrate reusable CSS
stylesheets. <a href='css.html'>Go back</a>.</p>
<p>Want to try crossing out an <a href='nowhere.html'>obsolete link</a>? This
is your chance!</p>
</body>
</html>
CSS Stylesheets
CSS stylesheets are stored in plain text files with a .css extension. Generate a new file named "styles.css" within our hi-css folder. This file will serve as the repository for all our example code snippets in this chapter. Let's include a single CSS rule to verify that our stylesheet is correctly linked to our HTML pages.
body {
  color: #FF0000;
}
A CSS "rule" always starts with a "selector," which specifies which HTML elements it should impact. In this instance, our aim is to style the <body> element. Following the selector, there's a "declarations block" enclosed in curly braces. Any "properties" we establish within this block will influence the <body> element.
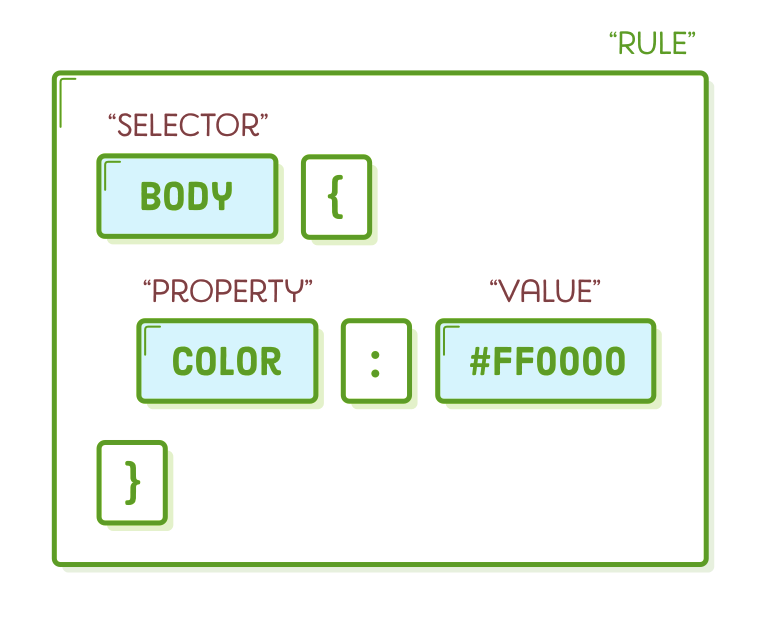
"Color" is a built-in property defined by the CSS specification, responsible for dictating the text color of the selected HTML elements. It accepts a hexadecimal value representing a color, where #FF0000 signifies a vivid red hue.
CSS properties bear a resemblance to HTML attributes in that they both involve key-value pairs. However, in the realm of CSS, we are defining presentational details rather than contributing to the semantic significance of the underlying content.
Linking a CSS Stylesheet
When you attempt to load either of the HTML pages in a browser, you won't observe our stylesheet in action. This is because we haven't connected them yet. This is where the HTML <link/> element comes into play. In hi-css.html, modify the <head> section as follows:
<head>
  <meta charset='UTF-8'/>
  <title>Hi, CSS</title>
  <link rel='stylesheet' href='styles.css'/>
</head>
The <link/> element serves as the mechanism by which browsers are informed to load styles.css when rendering our hi-css.html page. Consequently, we should now observe intensely red text throughout the page:
The <link/> element bears similarities to the <a> element but is specifically designed for use within the <head> section. As it resides in the document's head, <link/> establishes connections to metadata that are defined externally to the current document. Additionally, it's worth noting that <link/> is an empty element, which means it doesn't require a closing tag.
The "rel" attribute specifies the connection or relationship between the resource and the HTML document. While "stylesheet" is the most prevalent value, there are a few other alternatives available. The "href" attribute functions similarly to what we've seen in the previous chapter, with the distinction that it should point to a .css file instead of another web page. The "href" value can be either an absolute, relative, or root-relative link.
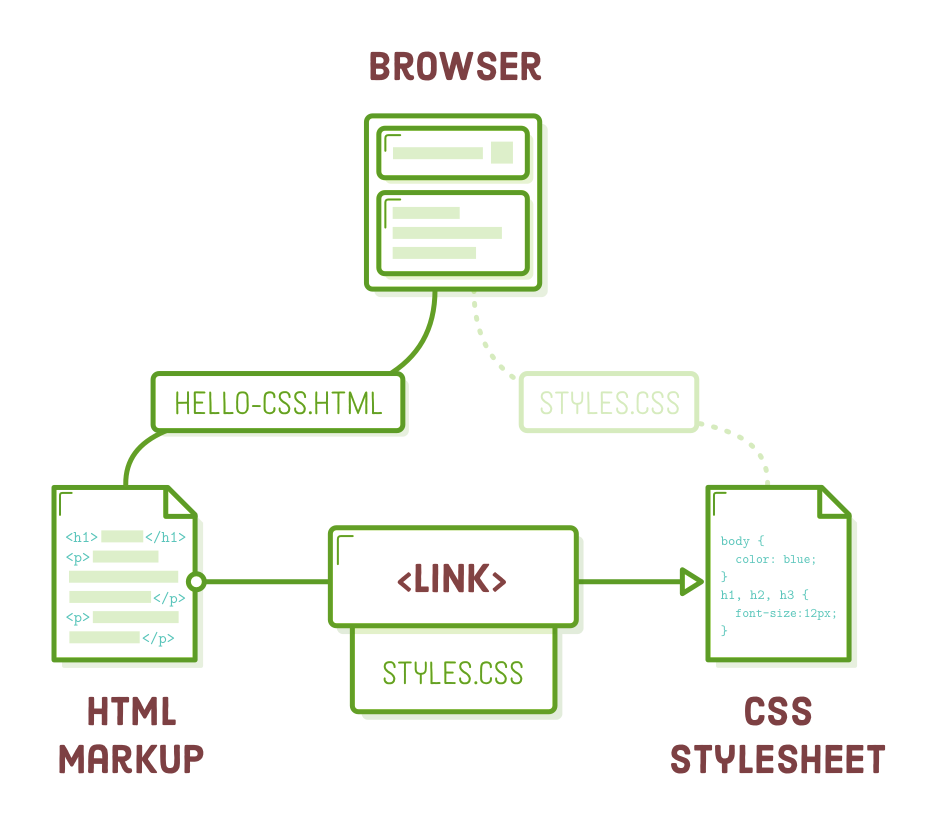
It's essential to recognize that there's no direct link between the browser and our stylesheet. The browser can only access it through the HTML markup. CSS, images, and even JavaScript depend on an HTML page to serve as the adhesive that binds everything together, underscoring the pivotal role of HTML as the core of most websites.
CSS Comments
Now that our stylesheet is connected, let's experiment with it a bit. That intense red is quite jarring. Instead, let's mellow it out to a pleasant shade of gray:
body {
  color: #414141;    /* Dark gray */
}
Take note that comments in CSS have a slight variation compared to their HTML counterparts. In CSS, comments are disregarded when enclosed within /* and */ characters, as opposed to the syntax used in HTML.
Setting Multiple Properties
You can include as many properties as needed within the declarations block of a CSS rule. To modify the background color of the entire web page, update our rule as shown below:
body {
  color: #414141;               /* Dark gray */
  background-color: #EEEEEE;    /* Light gray */
}
The "background-color" property bears a striking resemblance to the "color" property, but it dictates the background color of the chosen element. Take a moment to appreciate the presence of semicolons at the conclusion of each declaration. Omitting them will result in a malfunctioning CSS rule, so it's essential to always ensure the presence of semicolons!
Why did we opt for shades of gray instead of pure black and white? Well, employing a #000000 background alongside a #FFFFFF text color creates an excessive level of contrast. This extreme contrast can lead to an unsettling visual effect, making it appear as though the page is vibrating, which can be highly distracting for readers.
Selecting Different Elements
Certainly, you'll likely want to apply styles to elements other than <body>. To achieve this, just include additional CSS rules with distinct selectors. For instance, we can adjust the font size of our <h1> headings as follows:
body {
  color: #414141;               /* Dark gray */
  background-color: #EEEEEE;    /* Light gray */
}

h1 {
  font-size: 36px;
}
If you wish to modify the appearance of h2 headings, you can introduce another rule:
h2 {
  font-size: 28px;
}
Units of Measurement
Numerous CSS properties demand a specified unit of measurement. While there are various units available, the most frequently encountered ones are px (pixels) and em (pronounced like the letter "m"). Pixels (px) are straightforwardly what you'd consider as pixels, irrespective of whether the user employs a retina display or not. On the other hand, em is determined by the current font size of the element being referred to.

The em unit proves highly advantageous for establishing sizes in relation to a specified base font. In the illustration above, you can observe em units adjusting to align with base font sizes of 12px, 16px, and 20px. To provide a practical example, contemplate the following alternative to the preceding code snippet:
body {
  color: #414141;               /* Dark gray */
  background-color: #EEEEEE;    /* Light gray */
  font-size: 18px;
}

h1 {
  font-size: 2em;
}

h2 {
  font-size: 1.6em;
}
This configuration establishes the document's base font size at 18px and specifies that our <h1> elements should be double that size, while <h2> elements should be 1.6 times larger. If we, or the user, were to adjust the base font size in the future, em units would enable the entire page to scale proportionally.
Selecting Multiple Elements
But what if we wish to apply some styles to all our headings? We certainly wouldn't want redundant rules, as that would eventually become a maintenance nightmare:
/* (You'll regret creating redundant styles like this) */
h1 {
  font-family: "Helvetica", "Arial", sans-serif;
}

h2 {
  font-family: "Helvetica", "Arial", sans-serif;
}

h3 {
  font-family: "Helvetica", "Arial", sans-serif;
}
/* (etc) */
Instead, we can encompass multiple HTML elements within a single CSS rule by separating them with commas. Incorporate this into our styles.css file:
h1, h2, h3, h4, h5, h6 {
  font-family: "Helvetica", "Arial", sans-serif;
}
This establishes the font to be employed for all our headings through a solitary rule. This approach is advantageous because if we ever need to modify it, we can make the change in just one location. Copying and pasting code is generally discouraged in web development, and employing multiple selectors can significantly minimize this practice.
Defining Fonts
"font-family" is another inherent CSS property that designates the typeface for the chosen element. It can accommodate multiple values since not all users possess the same set of fonts. In the provided code snippet, the browser endeavors to load the foremost font (Helvetica) and, if unavailable, resorts to Arial. Ultimately, it settles on the system's default sans-serif font if neither of the specified fonts is accessible.
Traditionally, depending on the fonts pre-installed on a user's system posed significant limitations for web designers. However, nowadays, web fonts have largely replaced system fonts. For a more in-depth exploration of this topic, you can refer to the Online Typography chapter of this tutorial.
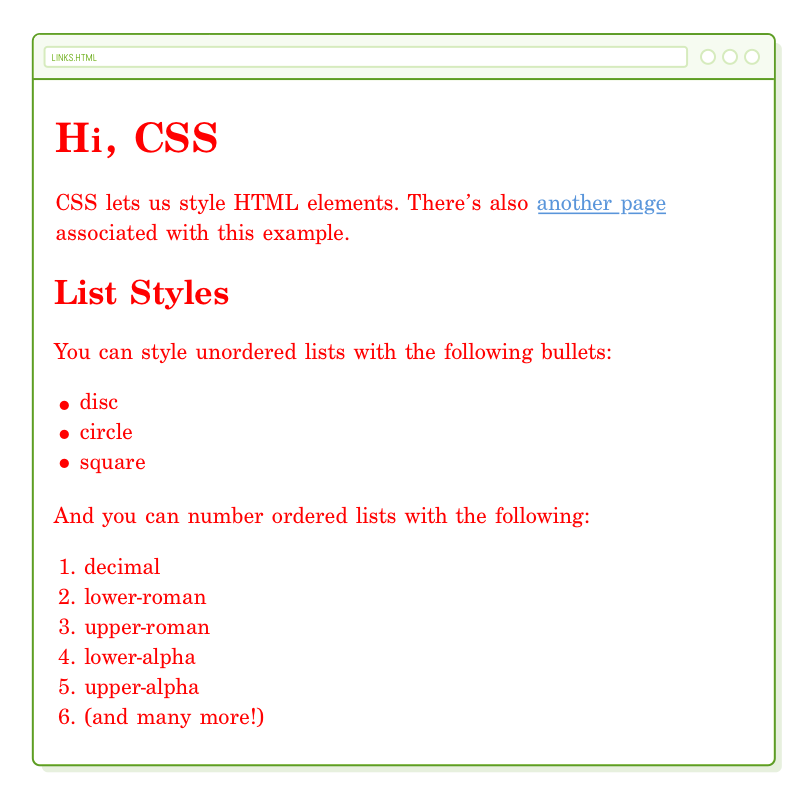
List Styles
The "list-style-type" property provides the means to modify the bullet or numbering style utilized for <li> elements. Usually, it's advisable to specify this property on the parent <ul> or <ol> element:
ul {
  list-style-type: circle;
}

ol {
  list-style-type: lower-roman;
}
Additional commonly used values can be discovered in the css.html example page. Notably, "none" is of interest and is frequently employed when structuring menu navigation with a <ul> list. The "none" value permits the styling of menu list items to resemble buttons. In the Advanced Positioning chapter, we'll put this technique into practice to construct the navigation menu depicted below.
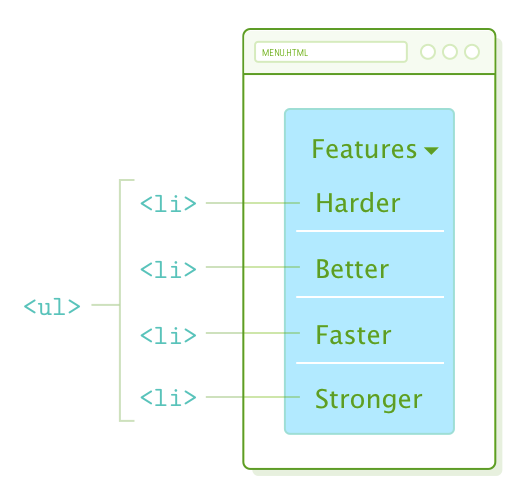
This serves as a notable illustration of the division between content and presentation. While a navigation menu is essentially an unordered list, it's often more sensible to present it as buttons rather than a conventional bulleted list. Thoughtfully structured HTML enables search engines to deduce the content's structure, while CSS empowers us to present it to users in visually appealing ways.
You have the flexibility to craft customized bullets for <li> elements using the "list-style-image" property (for further information, refer to MDN).
Setting the text color and customizing bullet styles may appear trivial, and in a way, they are. However, consider the broader perspective: it's about attaining absolute control over the visual presentation of an HTML document. Individually, a single CSS property might seem inconsequential, but when combined, they empower you to fashion a completely personalized web page.
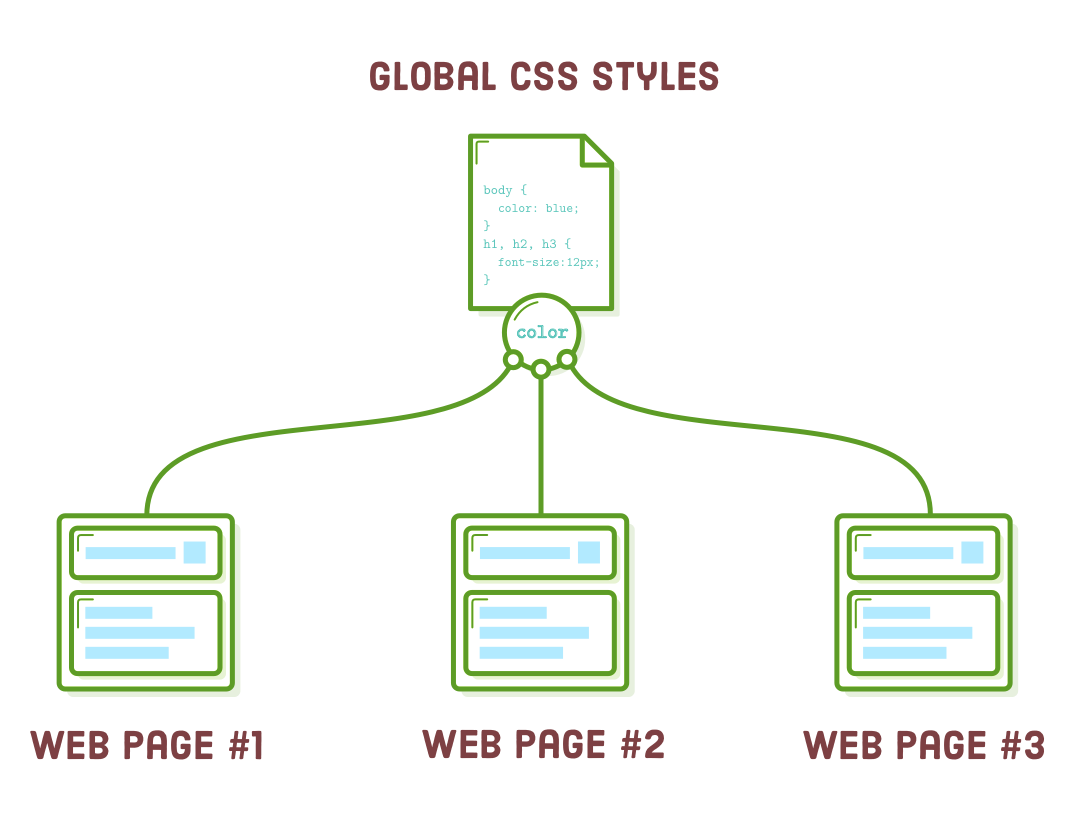
Reusable Stylesheets
So, we've just established some fundamental styles for one of our web pages. It would be exceptionally handy if we could apply these styles to our other page as well. To accomplish this, all we have to do is incorporate the same <link/> element into any other pages we wish to style. Give it a try by inserting the following line into the <head> section of dummy.html:
<link rel='stylesheet' href='styles.css'/>
Presently, our dummy.html pages should conform to the styles defined in our css.html page. Any alterations made to styles.css will seamlessly propagate to both of our web pages. This is the method to achieve a uniform appearance and user experience across an entire website.
In nearly all cases, you'll have at least one stylesheet that's applied universally across the entire website. It's generally advisable to employ root-relative paths when linking global stylesheets to prevent complications in nested pages. For instance, in a scenario where you have a page located at some-folder/page.html, you'd need to use ../styles.css to reference our styles.css file, and this can become quite perplexing as your site grows.
More Text Styles
There's a plethora of diverse CSS properties that we'll be introducing throughout this tutorial. However, for now, let's conclude by exploring some of the most frequently used techniques for text formatting.
Underlines
The "text-decoration" property is responsible for deciding whether text should be underlined or not. By assigning it the value of "none," we can eliminate the default underlining from all our links. We'll delve deeper into link styles in subsequent discussions.
a {
  text-decoration: none;
}
Another frequently employed value for "text-decoration" is "line-through," which is used to strike out text to indicate it as "deleted." However, it's essential to bear in mind that meaning should primarily be conveyed through HTML, not CSS. It's more appropriate to use the <ins> and <del> elements rather than applying a line-through style to, for instance, a standard <p> element.
Text Alignment
The appropriately named "text-align" property establishes the alignment of text within an HTML element.
p {
  text-align: left;
}
Other accepted values include "right," "center," or "justify." However, it's important to note that it always aligns the text to the entire page:
This isn't the desired behavior for most websites. We'll delve into the reasons for this in the next chapter when we begin discussing CSS boxes.
Font Weight and Styles
The "font-weight" property determines the level of "boldness" for text within an element, while the "font-style" property signifies whether it should appear in italics or not.
Suppose we prefer our headings not to appear in bold. Modify our rule for heading fonts in styles.css to align with the following:
h1, h2, h3, h4, h5, h6 {
  font-family: "Helvetica", "Arial", sans-serif;
  font-weight: normal;                              /* Add this */
}
These properties vividly illustrate the separation between content (HTML) and presentation (CSS). The following rules interchange the appearance of the <em> and <strong> elements:
/* (You probably shouldn't do this) */
em {
  font-weight: bold;
  font-style: normal;
}

strong {
  font-weight: normal;
  font-style: italic;
}
We don't recommend implementing this approach for actual websites. Nonetheless, font weights and styles will gain significance when we delve into using custom fonts in the Online Typography chapter.
The Cascade
The "cascading" aspect of CSS derives from rules flowing down from various origins. Up to this point, we've encountered one primary location for defining CSS: external .css files. Nevertheless, external stylesheets represent only one of numerous locations where you can place your CSS code.
The CSS structure for every webpage is structured as follows:
- Browser default styles
- User agent stylesheets
- External stylesheets (that's us)
- Page-Specific styles (that's also us)
- Inline styles (that could be us, but it's something we should always avoid.)
This list is arranged from the lowest to the highest level of importance, indicating that styles specified in each subsequent step take precedence over those in previous steps. For instance, inline styles will always take precedence over the default browser styles. In the upcoming sections, we will delve into the last two options, as these are the areas where web developers have control (in addition to the external styles we've already been using).
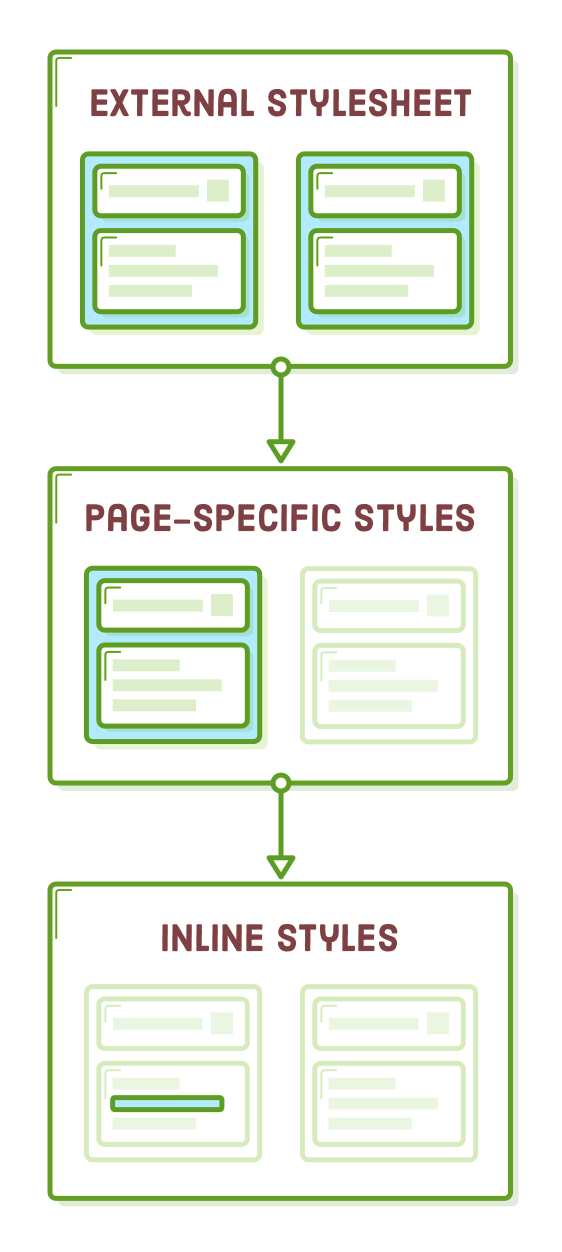
We introduced you to external stylesheets to set you on the right track. While it's crucial to grasp page-specific and inline styles since you'll encounter them in real-world scenarios, it's essential to recognize that external stylesheets are the optimal choice for defining your website's appearance.
Page-Specific Styles
The <style> element serves the purpose of incorporating page-specific CSS rules into individual HTML documents. You'll always find the <style> element residing in the <head> section of a web page, which aligns with its nature as metadata rather than actual content.
As an illustration, let's apply some styles to our dummy.html page by modifying its <head> element like this:
<head>
  <meta charset='UTF-8'/>
  <title>Dummy</title>
  <link rel='stylesheet' href='styles.css'/>
  <style>
    body {
      color: #0000FF;    /* Blue */
    }
  </style>
</head>
These styles apply exclusively to dummy.html. Our css.html page will remain unaffected. If you've done it correctly, you should see vibrant blue text when you load dummy.html in a browser.
Anything you would typically place in our styles.css file can be placed within this <style> element. It follows the exact same CSS syntax as an external stylesheet, but any rules specified here will take precedence over those in our styles.css file. In this instance, we're instructing the browser to disregard the color property defined for <body> in our external stylesheet and instead utilize #0000FF.
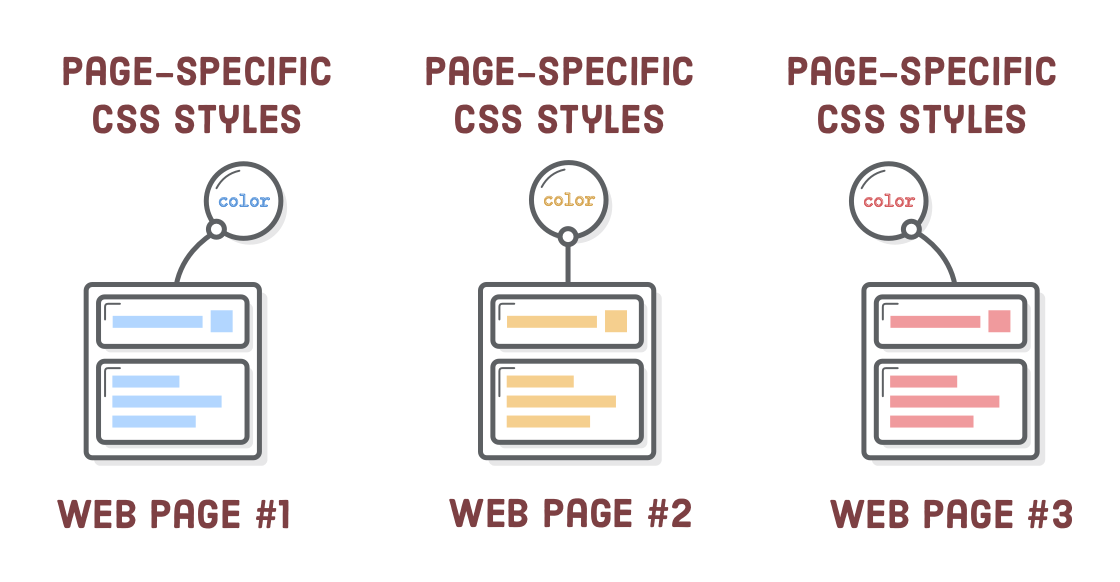
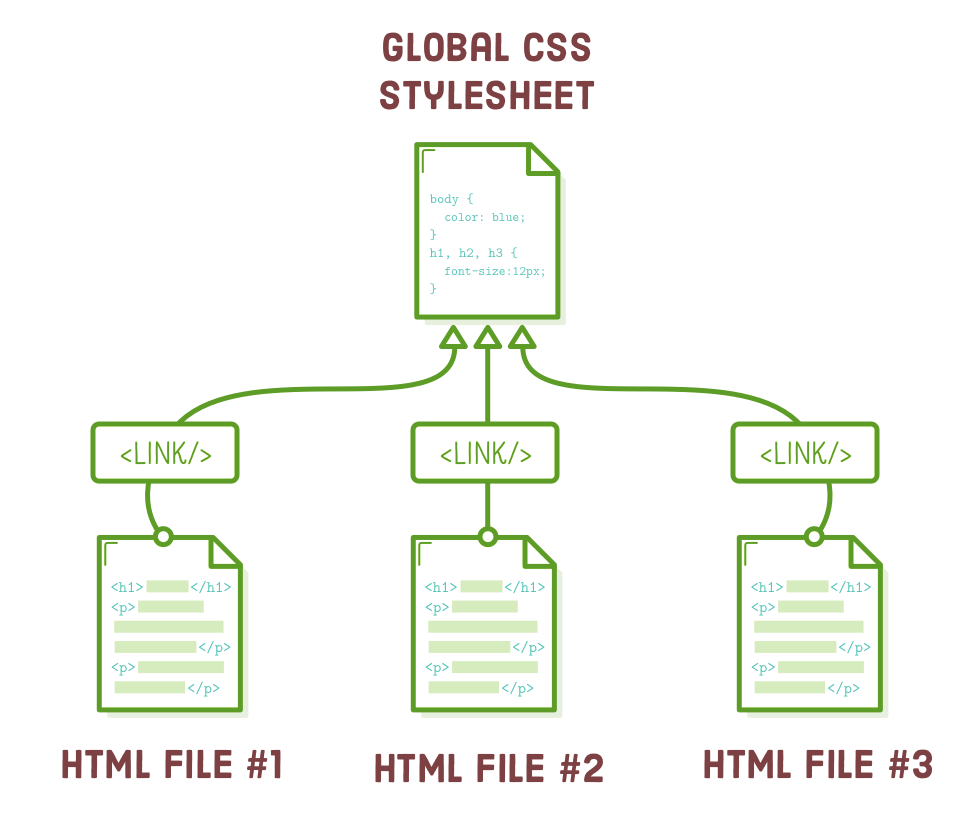
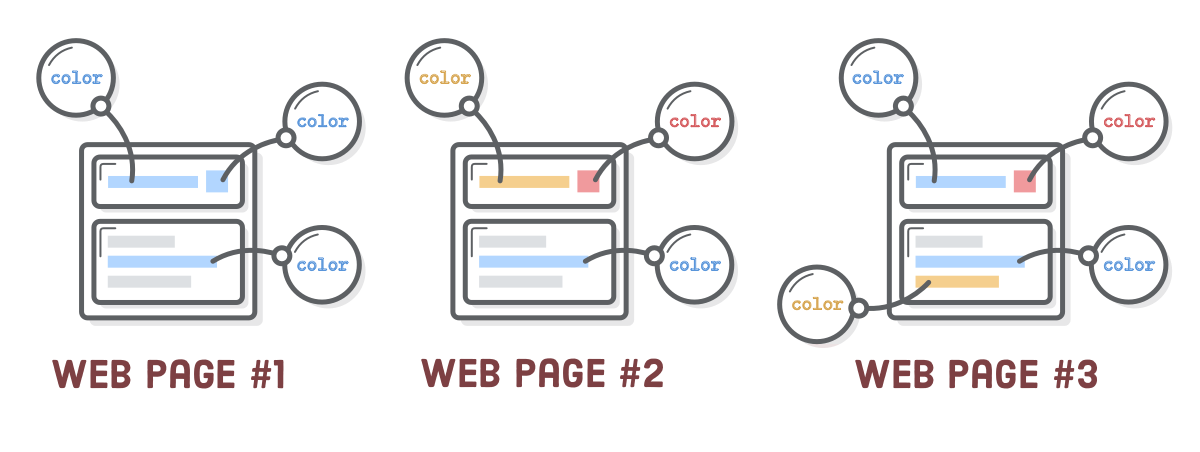
The challenge with page-specific styles lies in their maintenance. As illustrated in the diagram above, when you wish to apply these styles to another page, you must manually copy and paste them into that document's <head>. Identifying and managing redundant CSS rules across multiple .html files can be significantly more challenging than editing a single .css file.
Page-specific styles can be convenient in certain situations when you're pressed for time, but it's generally more advisable to centralize all your CSS within external stylesheets rather than using <style> elements.
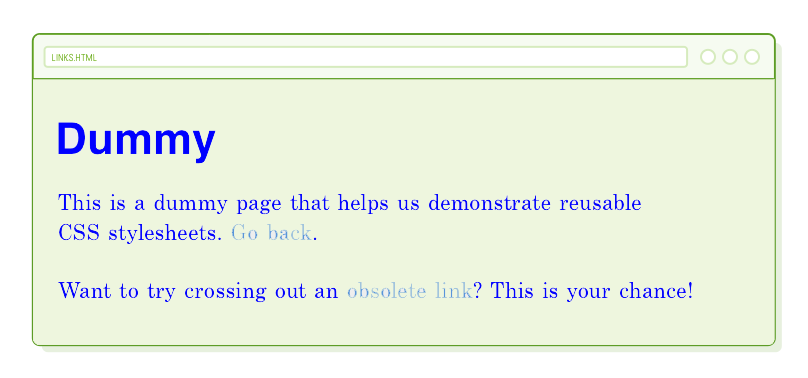
Inline Styles
You can also insert CSS rules directly into the style attribute of an HTML element. In the case of dummy.html, there's a link that doesn't have an actual destination. Let's make it appear in red using an inline style to indicate it's a dead link:
<p>Want to try crossing out an <a href='nowhere.html'
                                  style='color: #990000; text-decoration: line-through;'>obsolete link</a>?
   This is your chance!</p>
Just like page-specific styles, this follows the same CSS syntax we've been using. However, because it's placed within an attribute, it needs to be written in a single line. Inline styles are the most specific way to define CSS. The properties we specified here for color and text-decoration take precedence over everything else. Even if we were to later add a text-decoration: none rule in our <style> element, it wouldn't have any impact on this inline style.
It's crucial to steer clear of inline styles because they render it impossible to modify styles from an external stylesheet. If you ever plan to redesign your website later on, you won't be able to simply tweak a few rules in your global styles.css file. Instead, you'd have to painstakingly go through each page and revise the style attributes for every HTML element. This can be an extremely daunting task.
However, there will certainly be situations where you must apply styles to a particular HTML element. In such cases, it's always recommended to utilize CSS classes instead of resorting to inline styles. We will delve into the use of classes in the CSS Selectors chapter.
Multiple Stylesheets
CSS rules can be distributed among multiple external stylesheets by incorporating multiple <link/> elements within the same page. A prevalent scenario is to partition styles for various sections of your website. This allows you to systematically apply uniform styles to different categories of web pages.
For example, if we had numerous product pages that had a completely different appearance compared to our blog, we could employ the following approach. (Please note that we haven't actually defined these stylesheets, so there's no need to include them in our example project.)
<!-- All product pages have this -->
<head>
  <link rel='stylesheet' href='styles.css'/>
  <link rel='stylesheet' href='product.css'/>
</head>

<!-- While all blog posts have this -->
<head>
  <link rel='stylesheet' href='styles.css'/>
  <link rel='stylesheet' href='blog.css'/>
</head>
The sequence of the <link/> elements is significant. Stylesheets appearing later will take precedence over styles in earlier ones. Usually, you'll place your "base" or "default" styles in a global stylesheet (styles.css) and enhance them with section-specific stylesheets (product.css and blog.css). This approach enables you to structure CSS rules into manageable files while steering clear of the challenges posed by page-specific and inline styles.
Summary
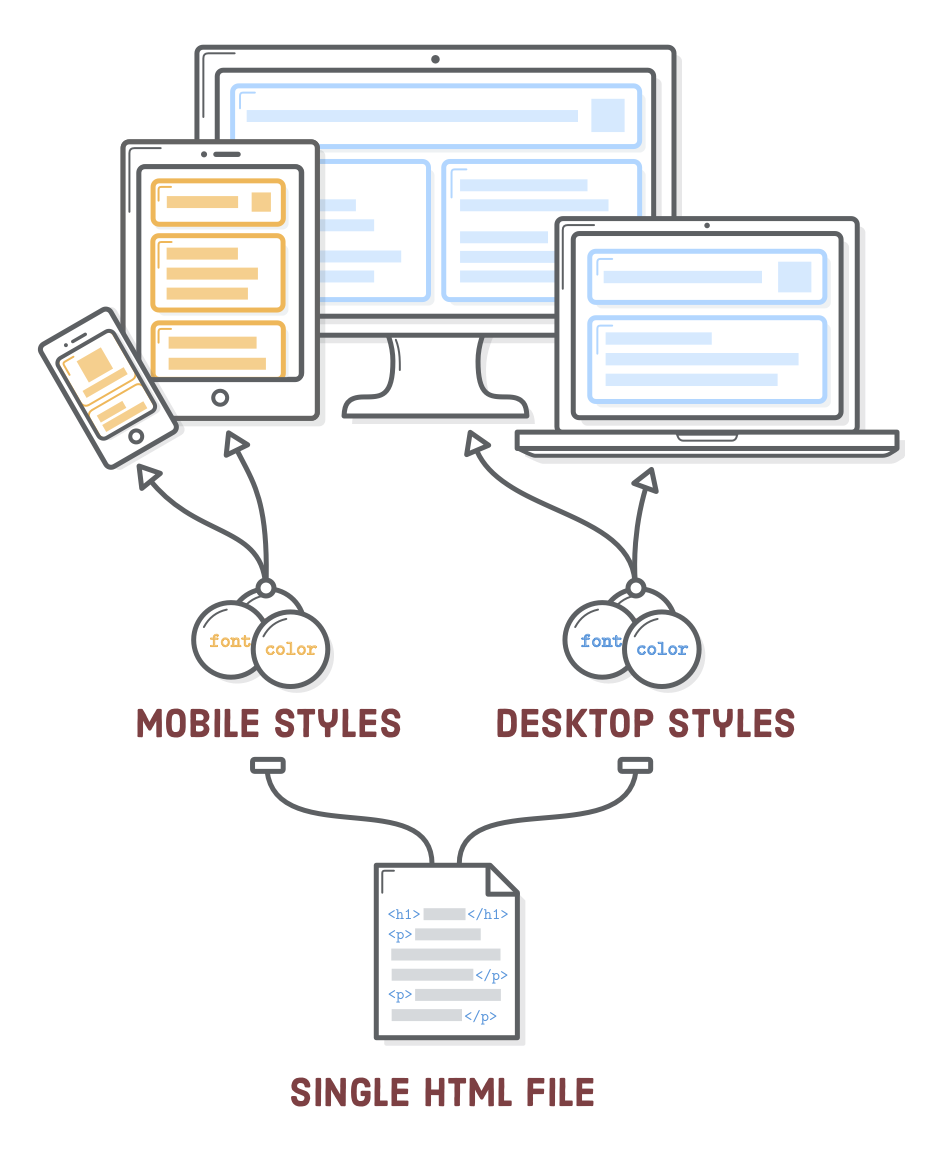
In this chapter, we emphasized the importance of separating content from presentation. This practice not only enables us to use the same CSS stylesheet across multiple HTML documents but also gives us the flexibility to selectively apply different CSS rules to the same HTML content, depending on the user's device, such as a mobile phone, tablet, or desktop computer. This concept is known as Responsive Design.
As a web developer, your task is to transform a well-designed mockup into an actual web page by applying your CSS expertise. While setting individual CSS properties is straightforward, the real challenge lies in effectively combining the multitude of built-in properties to precisely match the design requirements provided by your web designer. This often needs to be done efficiently and promptly.
In this chapter, our primary focus has been text formatting, but CSS offers a wide range of capabilities beyond that. In the next chapter, we'll delve into how CSS is used to structure the layout of our web pages. As a parting thought, keep in mind that you can always consult W3schools.com CSS Reference for clarification on how specific CSS properties function.