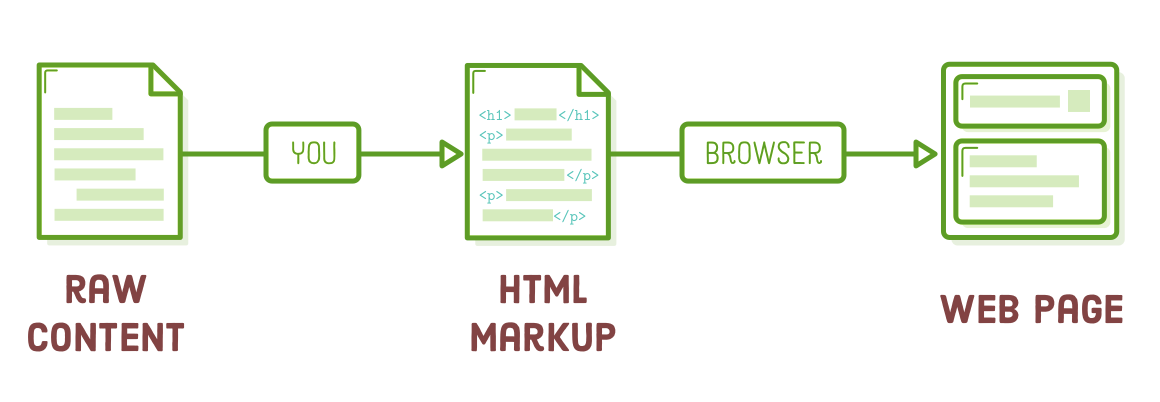
HTML is the language that delineates the content of every web page across the Internet. Through the process of "marking up" your raw content using HTML tags, you instruct web browsers on how various elements of your content should be presented. Crafting an HTML document with appropriately marked content is the inaugural phase of web page development.
Within this chapter, we will construct our inaugural web page. While its appearance may be less than ideal since it lacks CSS styling, it will serve as a comprehensive introduction to the fundamental HTML elements commonly employed by web developers in their daily work.
As you engage with the examples, aim to view them as a more interactive rendition of a WYSIWYG editor such as Google Docs or Microsoft Word. We'll be handling the same content types (headings, paragraphs, lists, etc.), albeit with a more explicit definition using HTML.
SETUP
To begin, initiate a fresh project directory named "basic-web-pages." Next, generate a new file named "basics.html" within this directory. This HTML file corresponds to a singular web page and will serve as the repository for all our code throughout this chapter.
Keep in mind that the fundamental process for web developers entails editing HTML within their text editor and subsequently examining those modifications in a web browser. Thus, this is precisely the approach you should adopt for each segment of this chapter.
You do not need a web server or a host account to create web pages. An editor and a browser are all that is required to follow along and test your code on your local computer.
Web Page Structure
Incorporate the provided HTML markup into our "basics.html" file. This serves as the foundational structure for every web page you'll ever create. Ordinarily, you might employ a templating engine to circumvent the repetition of these standardized portions. However, in this tutorial, our emphasis is on working with raw HTML.
<!DOCTYPE html>
<html>
  <head>
    <!-- Metadata goes here -->
  </head>
  <body>
    <!-- Content goes here -->
  </body>
</html>
Initially, we must inform browsers that this is an HTML5 web page by including the <!DOCTYPE html> declaration. This string serves as a distinctive identifier that browsers search for when rendering our web page, and it must always precisely match the format shown above.
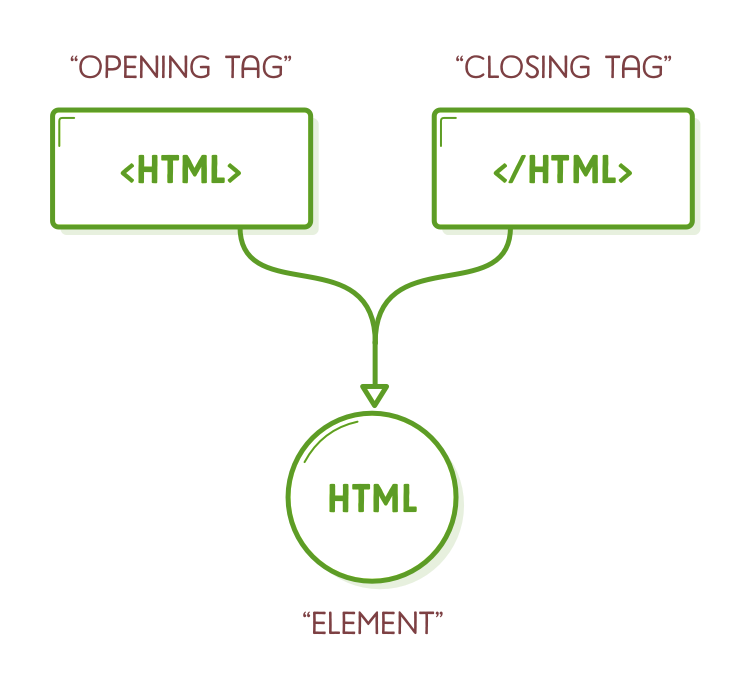
Subsequently, we must enclose our entire web page within <html> tags. The text <html> is what we refer to as the "opening tag," while </html> is known as the "closing tag." Everything encompassed by these tags constitutes part of the <html> "element," which can be envisioned as an intangible construct formed when a web browser interprets your HTML tags.
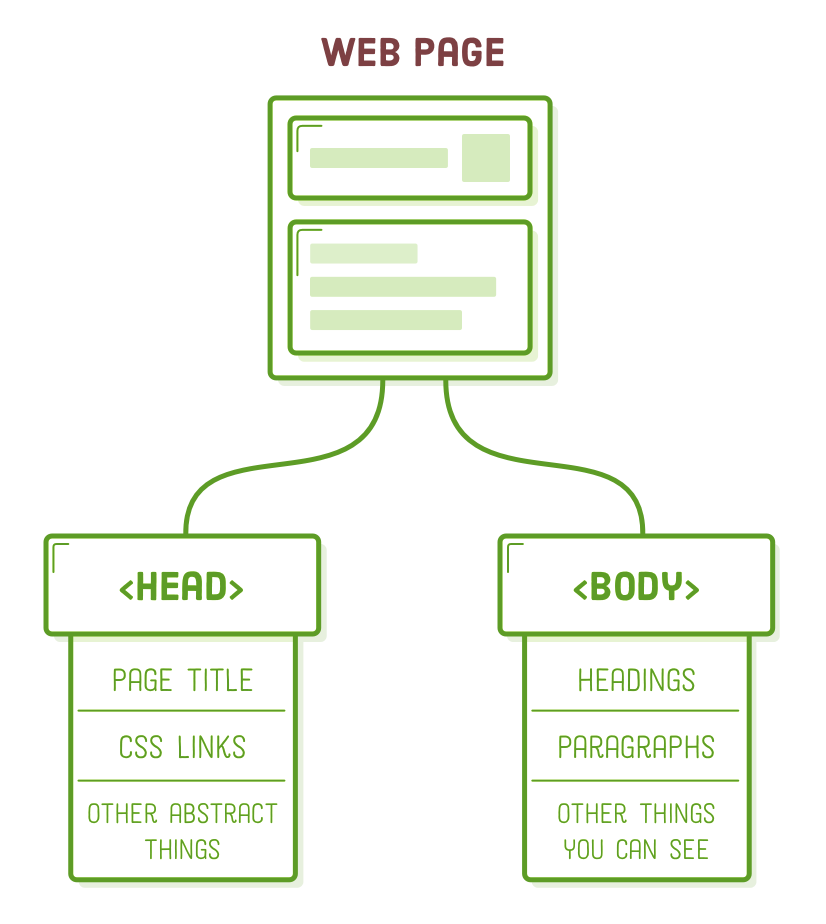
Within the <html> element, we encounter two additional elements: <head> and <body>. The <head> of a web page encompasses all its metadata, such as the page title, any CSS stylesheets, and other essential elements for rendering the page, although they are typically hidden from the user. The majority of our HTML code will reside within the <body> element, which signifies the content visible to the user. It's important to note that opening our page in a web browser won't reveal anything because the <body> is currently empty.
The rationale behind separating <head> and <body> will become more apparent in a few chapters when we commence our work with CSS.
Take note of the HTML comment syntax in the snippet above. Anything enclosed within <!-- and --> will be entirely disregarded by the browser. This feature proves beneficial for annotating your code and leaving reminders for yourself.
Page Titles
Among the vital metadata elements, the title of your web page, specified within the appropriately named <title> element, holds significant importance. Browsers showcase this title in the tab for your page, and it also appears in Google's search engine results.
Attempt to modify the <head> section of our "basic.html" file to align with the following:
<!DOCTYPE html>
<html>
  <head>
    <title>Demystified HTML!</title>
  </head>
  <body>
    <!-- Content goes here -->
  </body>
</html>
Upon refreshing the page in your browser, you will continue to observe a blank page, but you will also notice "Demystify HTML!" displayed in the browser tab.
Observe the meticulous nesting of HTML tags within our web page. It's crucial to maintain clean, non-overlapping elements. For instance, the <title> element should reside within the <head>, so it's imperative to avoid placing the closing </head> tag before the closing </title> tag, like this:
<!-- (Don't ever do this) -->
<head>
  <title>Demystified HTML!</head>
</title>
Paragraphs
Sure, titles are important, but let's take action that's visible. The <p> element signifies text within it as a separate paragraph. Experiment by including this <p> element within our web page's body:
<!DOCTYPE html>
<html>
  <head>
    <title>Demystified HTML!</title>
  </head>
  <body>
    <p>First, we need to learn some basic HTML.</p>
  </body>
</html>
You should now notice content displayed on the page. Once more, as this is content we intend to show, it should be placed within the <body> element, not in the <head>.
Additionally, observe that the <p> and <title> elements are indented two times, whereas <body> and <head> are indented once. Employing this indentation for nested elements is a valuable best practice that enhances the readability of your HTML for other developers (or even for yourself if you return in five months and need to make modifications).
Headings
Headings serve as page titles and are visible on the webpage. HTML offers six heading levels represented by tags <h1> through <h6>. A higher number indicates a less prominent heading.
Usually, the initial heading on a webpage is best represented using an <h1> tag. Let's add an <h1> tag above the current <p> element. It's a common practice for the first <h1> tag to mirror the <title> of the document, just as it's done here:
<body>
  <h1>Demystified HTML!</h1>
  <p>First, we need to learn some basic HTML.</p>
</body>
Typically, web browsers display headings of lower importance in smaller font sizes by default. For instance, let's add a second-level heading and observe the result:
<!DOCTYPE html>
<html>
  <head>
    <title>Demystified HTML!</title>
  </head>
  <body>
    <h1>Demystified HTML!</h1>
    <p>First, we need to learn some basic HTML.</p>

    <h2>Headings</h2>
    <p>Headings define the outline of your site. There are six levels of
    headings.</p>
  </body>
</html>
Headings serve as the primary means to structure various segments of your content. They establish the content's outline, visible to both users and search engines, underscoring the importance of selecting appropriate headings for a top-notch web page.
Unordered Lists
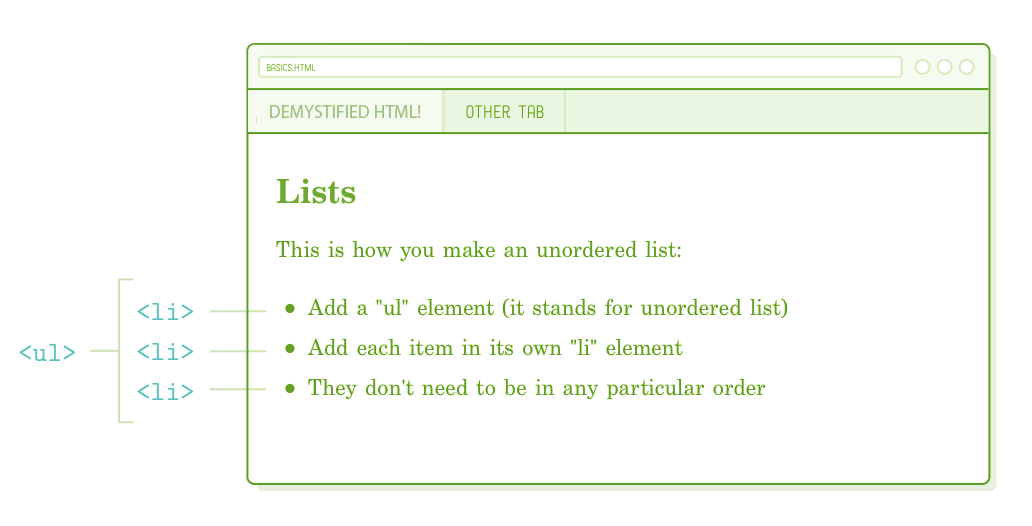
Each time you enclose text with HTML tags, you imbue that text with additional significance. When you envelop content with <ul> tags, you instruct the browser to display its contents as an "unordered list." To signify individual list items within it, you use <li> tags, as demonstrated below:
<h2>Lists</h2>

<p>This is how you make an unordered list:</p>

<ul>
  <li>Add a "ul" element (it stands for unordered list)</li>
  <li>Add each item in its own "li" element</li>
  <li>They don't need to be in any particular order</li>
</ul>
Once you insert this markup below the current content within the <body> element, you'll notice a list with bullets, one for each <li> element, becoming visible.
The HTML specification establishes precise guidelines regarding which elements can be nested within others. Specifically, <ul> elements are meant to exclusively contain <li> elements. Consequently, it's essential to never create something like this:
<!-- (This is bad!) -->
<ul>
  <p>Add a "ul" element (it stands for unordered list)</p>
</ul>
Instead, it's advisable to enclose that paragraph within <li> tags:
<!-- (Do this instead) -->
<ul>
  <li><p>Add a "ul" element (it stands for unordered list)</p></li>
</ul>
How can we be certain that <ul> exclusively accepts <li> elements, and that <li> permits nested paragraphs? This information comes from the reliable HTML element reference provided by the Mozilla Developer Network (MDN). While this tutorial aims to comprehensively cover the usage of fundamental HTML elements, if you ever find yourself uncertain about a specific element, a quick online search for "MDN <some-element>" can be quite helpful.
Ordered Lists
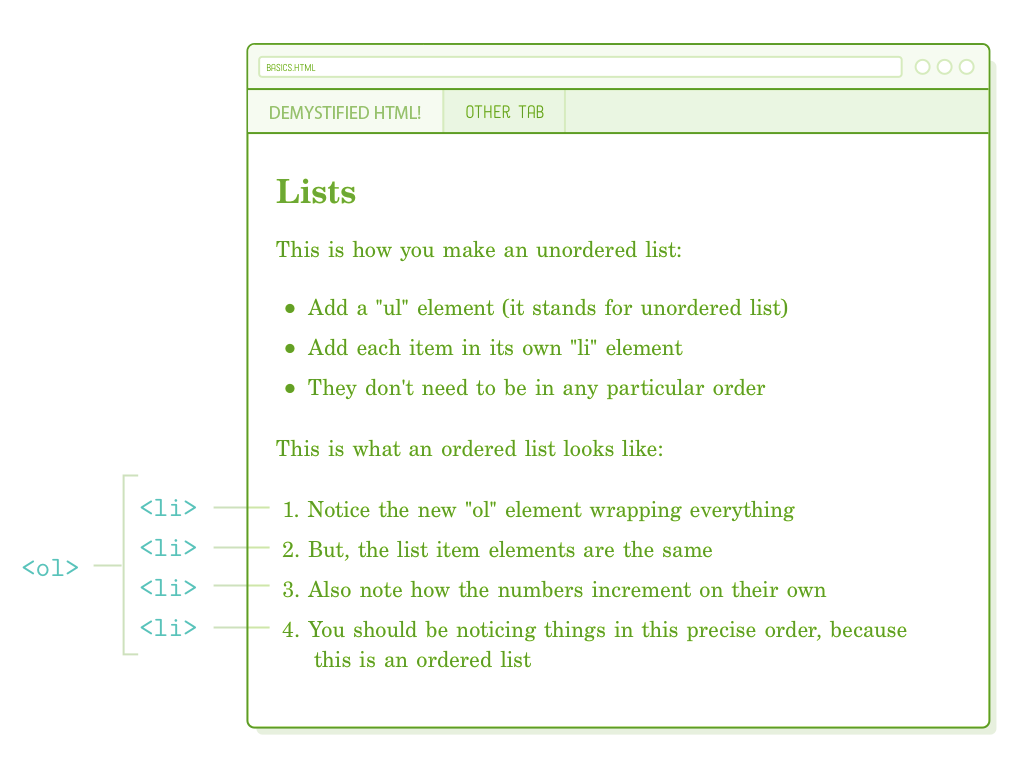
When working with an unordered list, reordering the <li> elements should not alter the list's intended meaning. If the order of list items is significant, consider employing an "ordered list" instead. To create an ordered list, you can easily switch the parent <ul> element to <ol>. Add the following content to the "Lists" section of basics.html:
<p>This is what an ordered list looks like:</p>

<ol>
  <li>Notice the new "ol" element wrapping everything</li>
  <li>But, the list item elements are the same</li>
  <li>Also note how the numbers increment on their own</li>
  <li>You should be noticing things is this precise order, because this is
      an ordered list</li>
</ol>
Upon refreshing the webpage in your browser, you will observe that the browser automatically incremented the count for each <li> element. In our upcoming exploration of CSS in the "Hi, CSS" section, we will discover how to customize the type of numbers displayed.
While the contrast between an unordered list and an ordered list may appear trivial, it holds genuine importance for web browsers, search engines, and, naturally, human readers. Additionally, it offers a more convenient alternative to manually numbering each list item.
Sequential processes such as recipes, instructions, and table of contents are well-suited for ordered lists, whereas <ul> lists are more appropriate for presenting item inventories, product features, pro/con comparisons, and navigation menus.
Emphasis (Italic) Elements
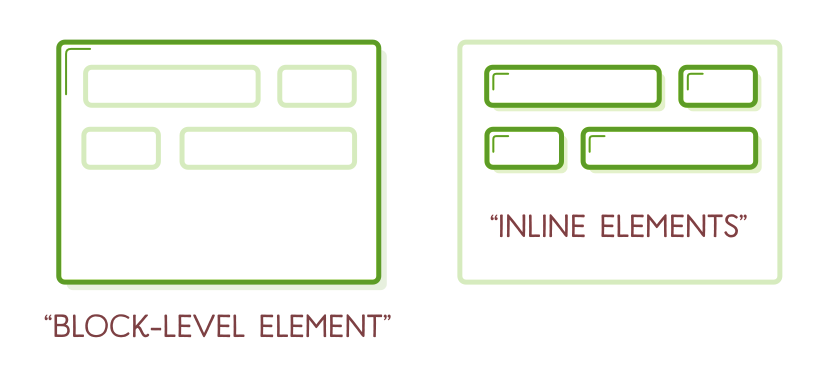
Up to this point, our focus has primarily been on "block-level elements" (sometimes referred to as "flow content"). The counterpart, "inline elements" or "phrasing content," behaves somewhat differently. Block-level elements consistently begin on a new line, whereas inline elements have the capability to influence text portions within a line, regardless of their position.
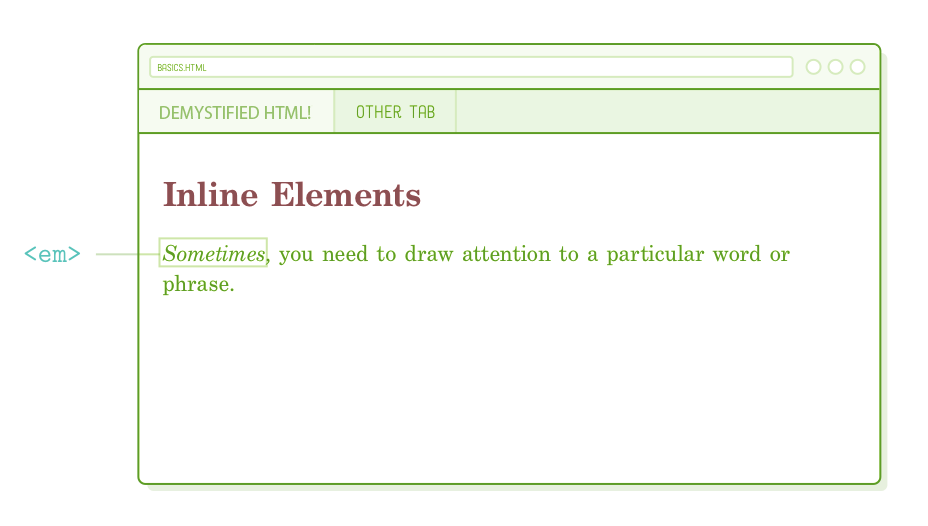
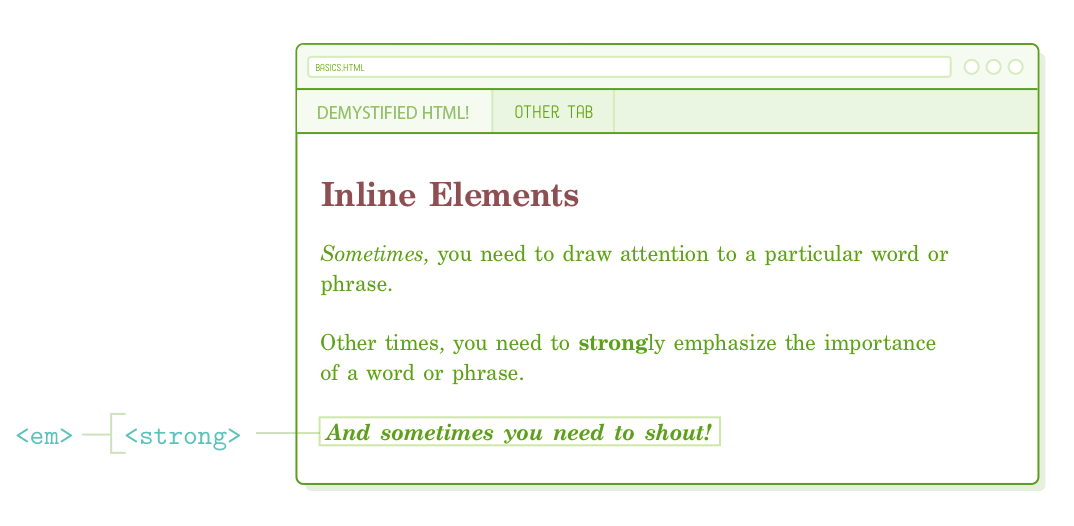
As an example, <p> represents a block-level element, whereas <em> is an inline element that applies to a specific portion of text within a paragraph. It's short for "emphasis" and is commonly rendered as italicized text. Feel free to include a new section in our sample web page to showcase text with emphasis.
<h2>Inline Elements</h2>

<p><em>Sometimes</em>, you need to draw attention to a particular word or
phrase.</p>
The content enclosed within <em> tags is expected to be displayed in italics, as depicted below. Take note of how italics apply to only a portion of a line, which is a defining feature of inline elements. In the chapter on the CSS Box Model, we will delve into how inline and block elements can significantly influence a page's layout.
To emphasize the point, it's crucial to correctly nest your HTML elements. When you're working with multiple inline elements, it becomes easier to inadvertently mix up the order of tags. Therefore, it's essential to ensure that your markup never resembles the following example:
<!-- (Again, don't ever do this) -->
<p>This is some <em>emphasized text</p></em>
Strong (Bold) Elements
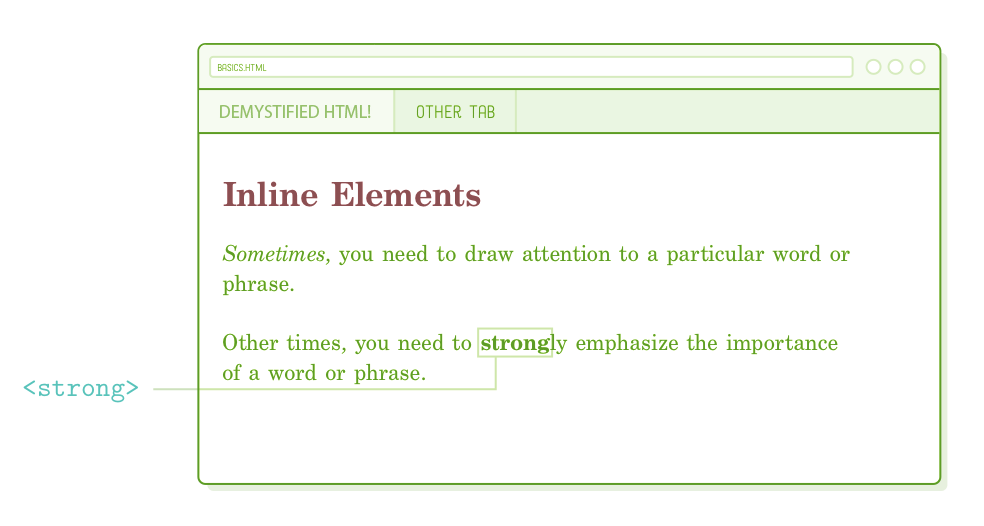
If you wish to add even more emphasis than what an <em> tag provides, you can opt for <strong>. Like <em>, it's also an inline element and is represented as follows:
<p>Other times you need to <strong>strong</strong>ly emphasize the importance
of a word or phrase.</p>
It should appear with bold formatting, as demonstrated below:
To further highlight a particular span of text, you can enclose a <strong> element within an <em> element (or vice versa). This combination will result in text that is strongly emphasized.
<p><em><strong>And sometimes you need to shout!</strong></em></p>
As indicated by the sample text, this essentially represents typographic emphasis akin to raising one's voice. It's advisable to review the Online Typography chapter before getting too carried away with bold and italic fonts.
Structure vs Presentation
You may be curious about our use of "emphasis" and "strong" instead of "italic" and "bold." This leads us to a crucial differentiation between HTML and CSS. HTML markup should convey semantic details about your content, rather than specifying its presentation. In essence, HTML should outline the document's structure, leaving its visual presentation to CSS.
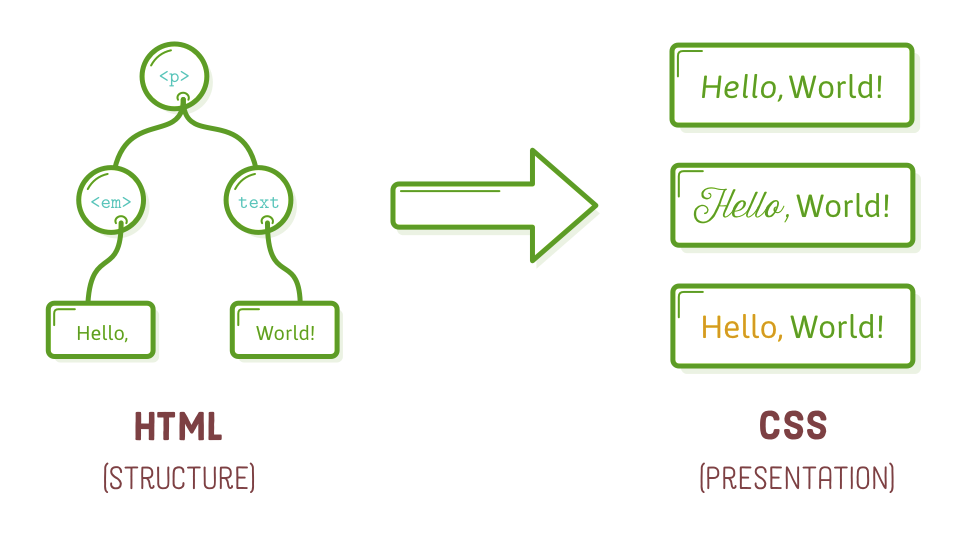
The somewhat outdated <b> and <i> elements serve as prime illustrations of this concept. Initially, they represented "bold" and "italic," respectively. However, with the advent of HTML5, there was an effort to establish a distinct boundary between a document's structure and its visual presentation. Consequently, <i> was substituted with <em>, as emphasized text can be presented in various ways beyond just being italicized, such as using a different font, color, or size. Similarly, the transition from <b> to <strong> was motivated by the same rationale.
As we will explore in the "Hi, CSS" section, we have the ability to modify how the browser initially presents the <strong> and <em> elements. This underscores the idea that we shouldn't explicitly label it as italicized or bold text in the HTML, as this is a decision best left to CSS.
Empty HTML Elements
The HTML tags we've encountered thus far either envelop text content (e.g., <p>) or contain other HTML elements (e.g., <ol>). However, this isn't the scenario for all HTML elements. Some of them can be considered "empty" or "self-closing." Among these, line breaks and horizontal rules are the most prevalent examples.
Line Breaks
HTML compresses consecutive spaces, tabs, or newlines, collectively referred to as "whitespace," into a single space. To witness this effect, incorporate the following section into our basics.html file:
<h2>Empty Elements</h2>

<p>Thanks for reading! HTML should be getting easier now.</p>

<p>Regards,
The Authors</p>
The newline following "Regards" in the snippet above will be converted into a space instead of being presented as a line break.
This behavior might appear counterintuitive, but it's a common practice among web developers to restrict the line length to approximately 80 characters in their text editors. From a programming perspective, this approach simplifies code management. However, if each of these newlines were to appear in the rendered page, it could significantly disrupt the intended page layout.
To instruct the browser to create a firm line break, we must utilize an explicit <br/> element, as demonstrated below:
<p>Regards,<br/>
The Authors</p>
The <br/> element proves valuable in situations where precise text formatting is crucial. Examples include haikus, song lyrics, and signatures, among others, where it can be quite advantageous.
Nonetheless, exercise caution and avoid overusing the <br/> tag. Each instance should retain its significance; it should NOT be employed excessively, such as for inserting excessive spacing between paragraphs.
<!-- (You will be shunned for this) -->
<p>This paragraph needs some space below it...</p>
<br/><br/><br/><br/><br/><br/><br/><br/>
<p>So, I added some hard line breaks.</p>
As explained in the preceding section, this type of stylistic information should be specified within your CSS rather than in your HTML.
Horizontal Rules
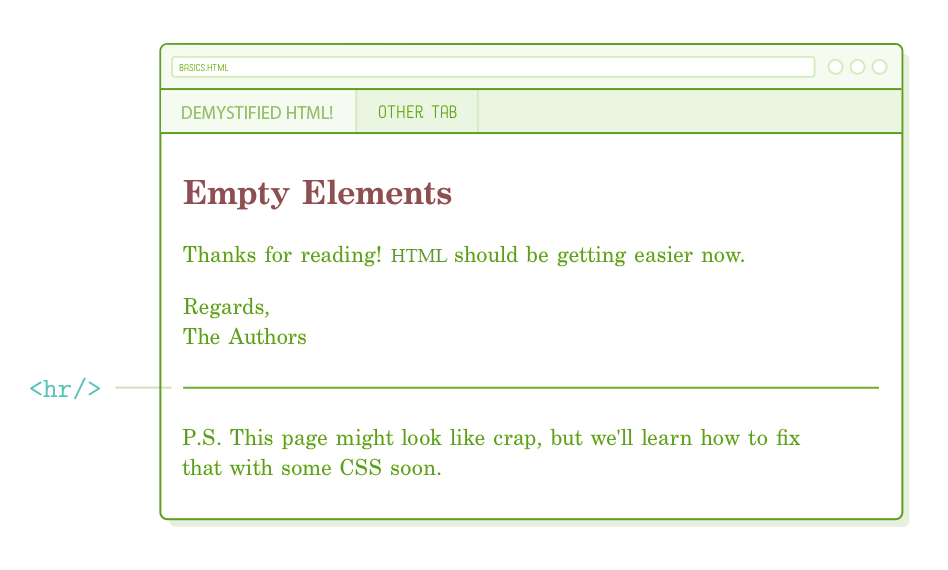
The <hr/> element, known as a "horizontal rule," symbolizes a thematic division. It is often suitable for marking transitions, such as moving from one scene in a story to the next or separating the main content of a letter from a postscript. For example:
<h2>Empty Elements</h2>

<p>Thanks for reading! HTML should be getting easier now.</p>

<p>Regards,<br/>
The Authors</p>

<hr/>

<p>P.S. This page might look like crap, but we'll fix that with some CSS
soon.</p>
One of the recurring themes in this chapter has been the distinction between content (HTML) and presentation (CSS), and the <hr/> element follows the same principle. Just like <em> and <strong>, it has a predefined appearance (a horizontal line), but as we delve into CSS, we'll have the ability to style it as additional spacing between sections, an ornamental design element, or virtually any other desired presentation.
Similar to <br/>, the <hr/> element should convey significance—avoid using it solely for the purpose of visual appeal. In such cases, you should opt for the CSS border property, which we'll explore in upcoming chapters.
Another perspective on the <hr/> element is that it signifies a separation with less weight than a new heading element but greater importance than a new paragraph.
Optional Trailing Slash
The inclusion of a trailing slash (/) in all empty HTML elements is entirely discretionary. The provided snippet could also be coded as follows (observing the absence of / in the <br> and <hr> tags):
<p>Regards,<br>
The Authors</p>

<hr>
The choice of convention doesn't have a significant impact, but it's advisable to select one and adhere to it for the sake of uniformity. In this tutorial, we'll be using the trailing / character because it explicitly indicates a self-closing element. This approach can aid in avoiding confusion when searching for the closing tag elsewhere in the document.
Summary
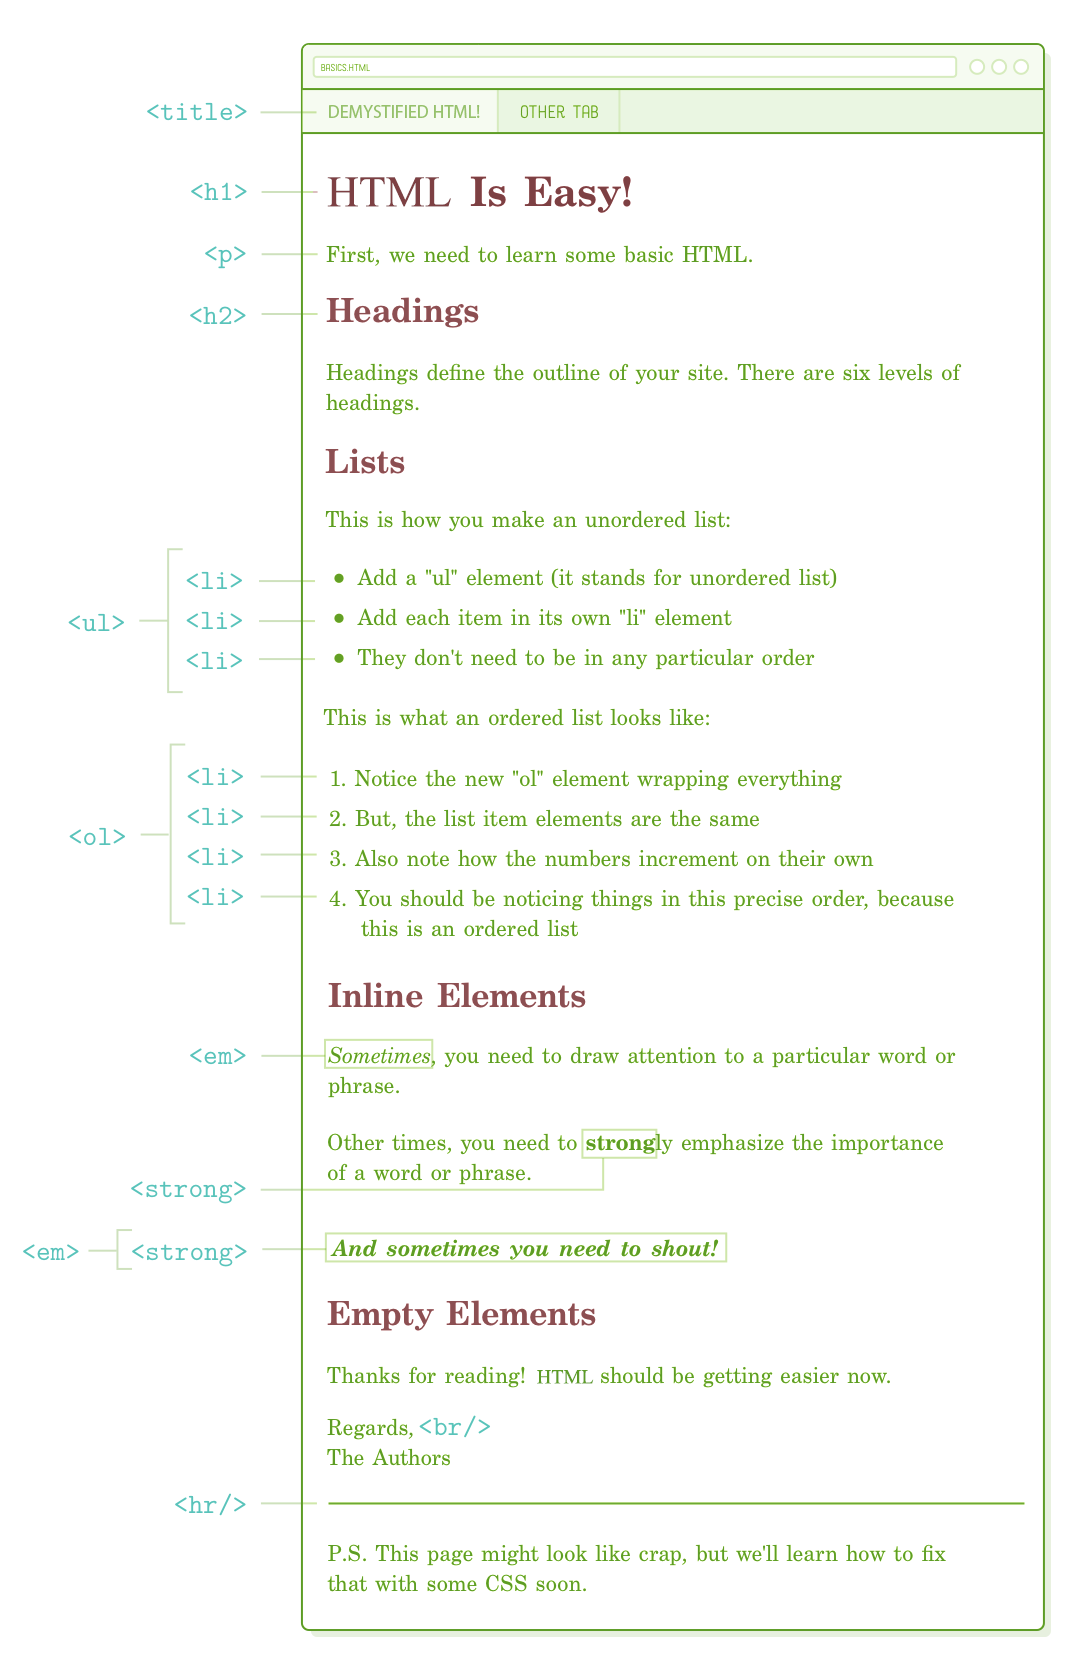
This chapter might have appeared as an extensive catalog of HTML elements, and to some extent, that's precisely what it was. In its essence, HTML is straightforward: web pages consist of HTML elements, each imparting distinct meaning to the enclosed text, and elements can be nested within one another.
What we've accomplished in this chapter is consistently the initial phase in the web development journey. You must articulate what you want to convey (HTML) before determining how to present it (CSS). Hopefully, the basics.html file we established in this chapter will serve as a valuable go-to resource for fundamental HTML elements. In case you misplace it, here's a depiction of what it should resemble:
We discussed how crafting HTML is somewhat akin to modifying content in a WYSIWYG document editor. Admittedly, HTML is a significantly more hands-on process, but it offers remarkable versatility in return. You can showcase it on a webpage, a mobile device, a tablet, or a printed document, each with distinct layouts. Furthermore, you can effortlessly revamp multiple documents by simply altering a single line of CSS. In comparison, Microsoft Word falls short of harnessing the potential of HTML and CSS as a content medium.
In the upcoming chapter, we will complete our HTML learning journey by covering the remaining elements you'll frequently encounter: links and images. As for the less commonly used elements, we'll encourage you to explore MDN's HTML Element Reference independently.