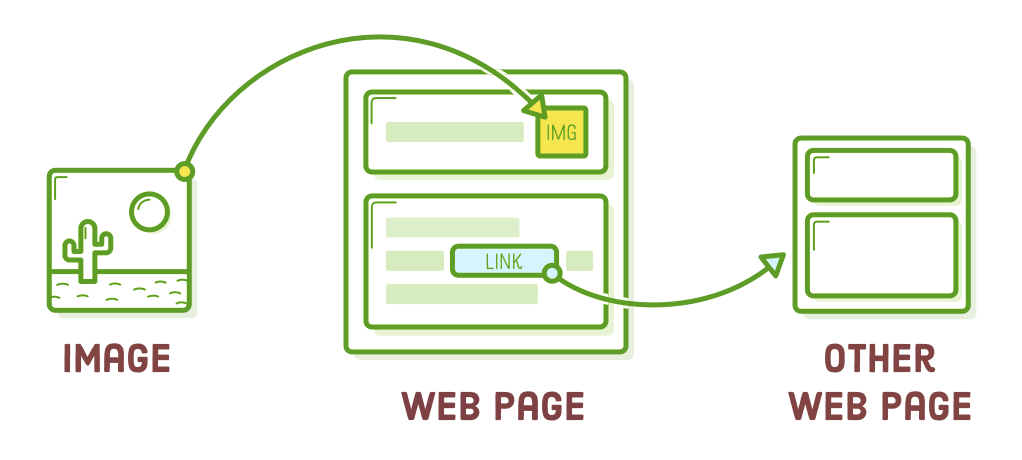
In the preceding section, we discussed crucial HTML elements, but our focus was solely on a single web page. However, links and images distinguish themselves from these elements as they involve external resources. Links direct users to another HTML document, while images incorporate external resources into the page.
To incorporate links and images effectively, we must also delve into another aspect of HTML syntax: attributes. Attributes will introduce a wide array of opportunities for enhancing our web pages.
In this chapter, we will construct a basic website consisting of multiple HTML documents and image files. While it's titled "Images and Links," the primary focus of this chapter revolves around organizing files and folders. As we venture into managing multiple files, we'll realize the significance of maintaining an organized approach as web developers.
SETUP
This chapter primarily centers on connecting web pages, which means we must generate fresh HTML files before diving into any coding. Throughout this chapter, we will be dealing with three distinct web pages and several image files in various formats.

To begin, establish a new directory named "images-and-links" to house all of our files. You can accomplish this within your chosen editor by following the same procedure outlined in the Introduction chapter.
Links Page
Next, include a fresh file in that directory titled "links.html" and paste the subsequent HTML template. You should find this template recognizable from the prior chapter.
<!DOCTYPE html>
<html>
  <head>
    <title>Links</title>
  </head>
  <body>
    <h1>Links</h1>
  </body>
</html>
Images Page
Within the same directory, generate another file named "images.html."
<!DOCTYPE html>
<html>
  <head>
    <title>Images</title>
  </head>
  <body>
    <h1>Images</h1>
  </body>
</html>
Extras Page
Our final page will aid us in illustrating relative links. To do this, establish a new directory within "images-and-links" called "misc," and then introduce a fresh file titled "extras.html" within it.
<!DOCTYPE html>
<html>
  <head>
    <title>Extras</title>
  </head>
  <body>
    <h1>Extras</h1>
  </body>
</html>
Keep in mind that in most cases, you can create a new folder directly within your preferred editor by right-clicking the file browser pane and choosing "New Folder" from the contextual menu. Staying within your text editor streamlines your workflow.
Image Downloads
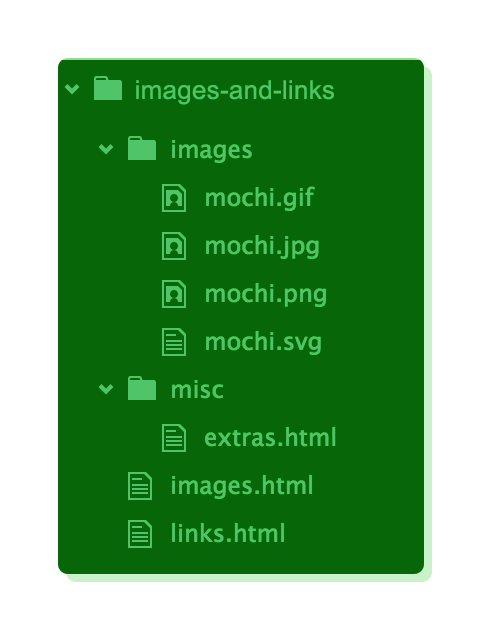
Since we'll be incorporating images into our "images.html" file, please download these sample images as well. Unzip them within your "images-and-links" directory, preserving the original "images" folder structure from the ZIP file. Your project layout should now resemble this:
Anchors
Links are generated using the <a> element, where "a" stands for "anchor." It functions similarly to the elements discussed in the prior chapter. When you enclose text within <a> tags, it modifies the significance of that content. Let's illustrate this by incorporating the following paragraph into the <body> element of "links.html":
<p>This example is about links and <a>images</a>.</p>
When you open the page in a web browser, you'll observe that the <a> element doesn't resemble a link in any way. Regrettably, the <a> element, on its own, doesn't have much functionality.
Links
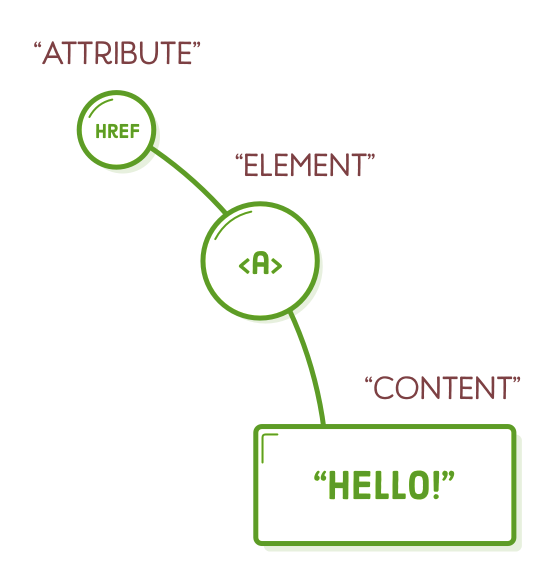
Similar to how an element imparts significance to the content it encloses, an HTML "attribute" imparts meaning to the element it is associated with.
Various elements permit various attributes, and you can consult w3schools.com for comprehensive information on which elements accept specific attributes. At this moment, our focus is on the "href" attribute as it dictates the destination when a user clicks on an <a> element. Modify your link to align with the following:
<p>This example is about links and <a href='images.html'>images</a>.</p>
Observe that attributes reside within the opening tag of an element. The attribute name is placed before an equal sign, followed by the attribute's "value," enclosed in either single or double quotation marks. This syntax serves to differentiate attributes from the content, which is placed between the tags.
The additional information supplied by the "href" attribute informs the browser that this <a> element functions as a hyperlink, prompting it to display the content in its default blue text.
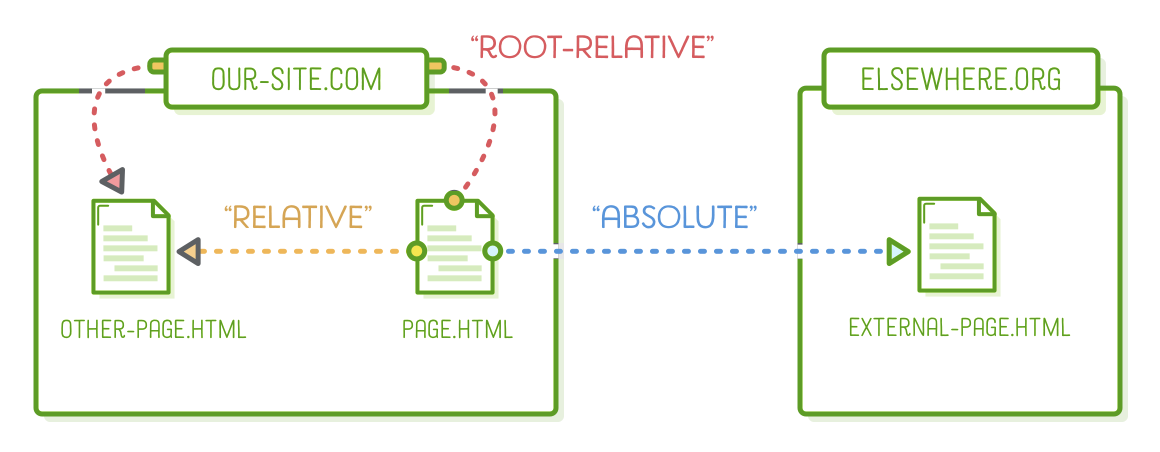
Absolute, Relative, and Root-Relative URLs
As we delve into working with links, it's essential to grasp the structure of a website. In our context, a website comprises HTML files arranged within folders. To reference these files from one file to another, the Internet employs "uniform resource locators" (URLs). The format of URLs can vary depending on what you're pointing to. We will be dealing with three distinct types of URLs, as outlined below:
Absolute, relative, and root-relative links pertain to the value assigned to the href attribute. In the forthcoming sections, we will clarify when and how to employ each of these link types. However, before delving into that, let's incorporate the following content into our "links.html" file:
<p>This particular page is about links! There are three kinds of links:</p>

<ul>
  <!-- Add <li> elements here -->
</ul>
Absolute Links
"Absolute" links provide the most comprehensive method for referencing a web resource. They commence with the "scheme" (usually http:// or https://), followed by the website's domain name, and then the path to the specific web page.

As an illustration, attempt to generate a link to the HTML element reference on the Mozilla Developer Network:
<li>Absolute links, like to
    <a href='https://developer.mozilla.org/en-US/docs/Web/HTML'>Mozilla
    Developer Network</a>, which is a very good resource for web
    developers.</li>
You can employ absolute links to point to pages within your own website, but embedding your domain name everywhere can lead to complex scenarios. It's generally a wiser approach to utilize absolute links primarily when guiding users to external websites.
Relative Links
"Relative" links direct to another file within your website based on the perspective of the file you are currently editing. It is understood that the scheme and domain name remain the same as the current page, so you only need to specify the path.
Let's demonstrate how to create a link to our "extras.html" file from within the "links.html" file:
<li>Relative links, like to our <a href='misc/extras.html'>extras
    page</a>.</li>
In this instance, the href attribute indicates the file path to "extras.html" from the "links.html" file. Since "extras.html" is not located in the same directory as "links.html," we must incorporate the "misc" folder in the URL.
Every folder and file in a path is divided by a forward slash (/). Therefore, if we wanted to access a file located two folders deep, our URL would look like this:
misc/other-folder/extras.html
Parent Folders
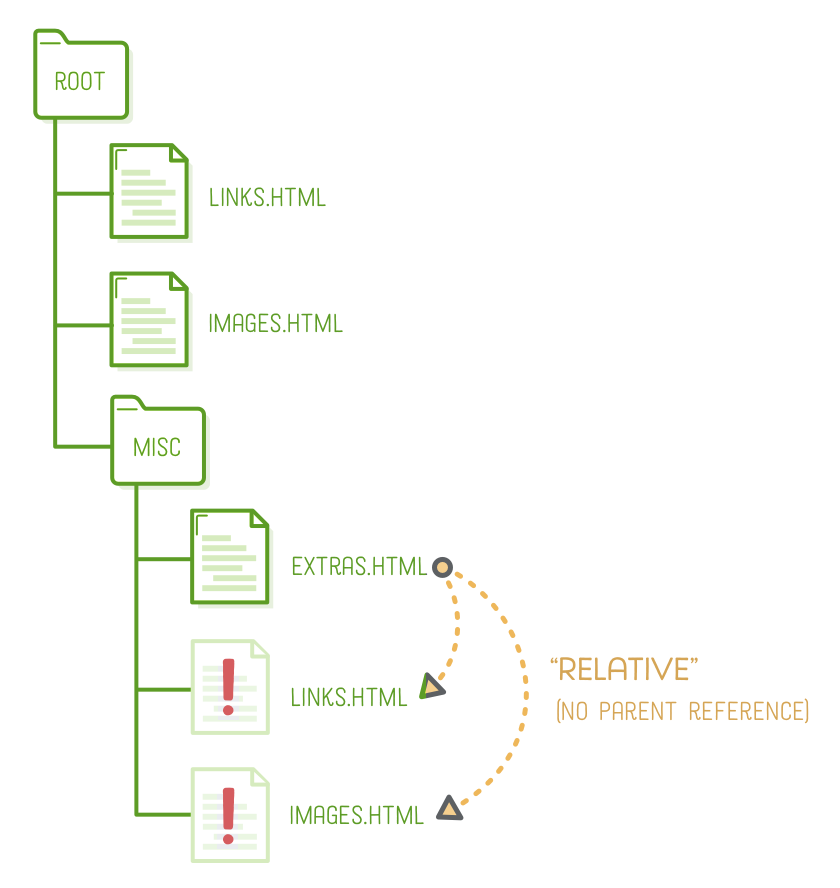
This method is suitable for referencing files located in the same folder or in subfolders. However, what if we want to create links to pages situated in a directory above the current file? Let's experiment with creating relative links to "links.html" and "images.html" from within our "extras.html" file. Include the following in "extras.html":
<p>This page is about miscellaneous HTML things, but you may
   also be interested in <a href='links.html'>links</a> or
   <a href='images.html'>images</a>.</p>
If you click on either of those links in a web browser, you will receive an error message indicating that the page doesn't exist. If you examine the address bar, you'll notice that the browser is attempting to load "misc/links.html" and "misc/images.html" - it's searching in the wrong folder! This occurs because our links are relative to the location of "extras.html," which is situated within the "misc" folder.
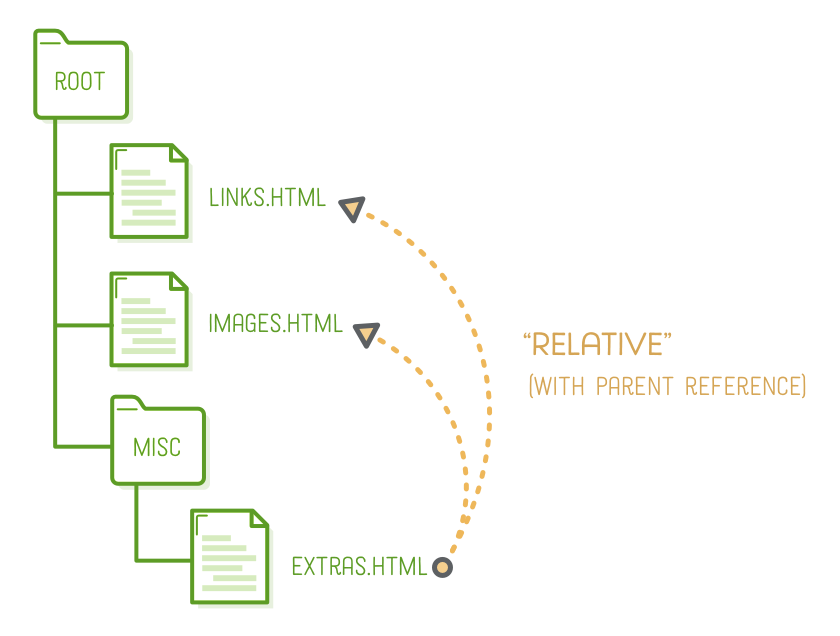
To resolve this issue, we require the ".." syntax. In a file path, two consecutive dots signify a reference to the parent directory:
<p>This page is about miscellaneous HTML things, but you may also be
   interested in <a href='../links.html'>links</a> or <a
            href='../images.html'>images</a>.</p>
This is akin to expressing, "I understand that 'extras.html' resides in the 'misc' folder. Ascend to the parent folder and search for 'links.html' and 'images.html' within it."
To traverse upwards through several directories, employ multiple ".." references, as demonstrated below:
../../elsewhere.html
Relative links offer flexibility by allowing you to navigate through folders without the need to modify the href attributes in your <a> elements. However, they can become somewhat perplexing when numerous links begin with multiple dots. They are most suitable for referencing resources within the same directory or within a self-contained section of your website.
Root-Relative Links
"Root-relative" links, in contrast to the previous section, are links that are not relative to the current page but rather relative to the main "root" of the entire website. For example, if your website is hosted on our-site.com, all root-relative URLs will be relative to our-site.com.
Regrettably, there's a limitation to our exploration of root-relative links in this tutorial: we're using local HTML files instead of a website hosted on a web server. This means we won't have the opportunity to test root-relative links. However, if we were operating with an actual server, the link to our home page would be structured as follows:
<!-- This won't work for our local HTML files -->
<li>Root-relative links, like to the <a href='/'>home page</a> of our website,
    but those aren't useful to us right now.</li>
The sole distinction between a root-relative link and a relative link lies in the presence of an initial forward slash in the former. This forward slash signifies the root of your site. After this initial slash, you can extend the path with additional folders and files, similar to how you would with relative links. The provided path will function correctly regardless of the current page's location, even if it's in a directory like misc/extras.html.
/images.html
Root-relative links are highly valuable types of links. They strike a balance between clarity, avoiding the potential ambiguity of relative links, and not being overly specific like absolute links. These links will become a common sight in your web development journey, particularly in larger websites where managing relative references can be challenging.
Link Targets
Attributes can change the interpretation of HTML elements, and there are instances when you need to adjust multiple characteristics of an element. As an illustration, <a> elements can also incorporate a target attribute, which specifies where the page should appear when the user clicks the link. In most cases, browsers naturally replace the current page with the new one. However, we can employ the target attribute to request the browser to open the link in a new window or tab.
Attempt to modify the absolute link in links.html to resemble the following format. Observe that the second attribute closely resembles the first one, but they are separated by a space (or a newline) from each other:
<li>Absolute links, like to
    <a href='https://developer.mozilla.org/en-US/docs/Web/HTML'
       target='_blank'>Mozilla Developer Network</a>, which is a very good
       resource for web developers.</li>
The target attribute offers several predefined values with specific functions for web browsers. However, the most frequently used one is "_blank," which designates a new tab or window. You can find information about the others on w3schools.com.
Naming Conventions
You might have observed that our files and folders deliberately lack spaces in their names. This is intentional because spaces in URLs demand special treatment and should be steered clear of whenever possible. To understand the issue better, try creating a new file within our links-and-images project and name it "spaces are bad.html." Insert some text into it, and then open it in Google Chrome or Safari (note that Firefox handles spaces differently).
links-and-images/spaces%20are%20bad.html
In the address bar, you'll notice that every space has been substituted with "%20," as demonstrated above. URLs do not permit spaces, and this is the specific encoding employed to represent them. Instead of using a space, it's advisable to employ a hyphen, which is the practice we've followed throughout this tutorial. Maintaining consistency by using all lowercase characters is also recommended.
Observe the clear link between our file and folder names and the corresponding web page URLs. The names of our directories and files establish the slugs for our web pages, and these slugs are visible to users. This emphasizes the importance of dedicating the same level of attention to naming your files as you do to crafting the content they hold.
These naming guidelines are applicable to all files within your website, not limited to HTML files. CSS files, JavaScript files, and images should also adhere to the practice of avoiding spaces and maintaining consistent capitalization.
Images
In contrast to the HTML elements we've explored thus far, image content is defined external to the web page that displays it. Fortunately, we already possess methods to reference external resources within an HTML document, namely absolute, relative, and root-relative URLs.
Images are incorporated into web pages using the <img/> tag along with its src attribute, which specifies the image file to be presented. You'll observe that it's an empty element, akin to <br/> and <hr/> from the previous chapter. (Please refrain from adding this to our project for now; we'll address specific examples in the next section.)
<img src='some-photo.jpg'/>
The presence of Retina displays and mobile devices introduces some additional intricacies when it comes to handling images, beyond what a standard <img/> tag entails. We will delve into these complexities in the Responsive Images chapter of this tutorial. Additionally, I recommend exploring the <figure> and <figcaption> elements covered in the HTML Semantics chapter.
For the time being, let's direct our attention toward the various image formats found on the Internet.
Image Formats
There are four primary image formats in use on the web, each designed for distinct purposes. Grasping their intended functions significantly enhances the quality of your web pages.
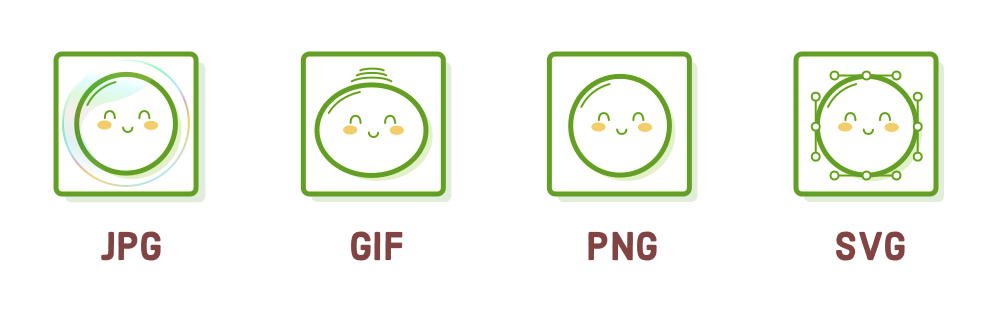
In the following sections, we will explore optimal scenarios for using each of these image formats. Before proceeding, ensure that you have extracted the sample images into your links-and-images project.
JPG Images
JPG images are tailored to efficiently manage extensive color palettes without significantly inflating file sizes. This attribute makes them well-suited for photographs and images containing numerous gradients. However, it's important to note that JPGs do not support transparent pixels, which becomes evident in the white edges of the image below if you examine closely:

Incorporate the mochi.jpg image into our images.html page using the following code snippet, which also includes navigation to our other pages:
<p>This page covers common image formats, but you may also be looking for <a
        href='links.html'>links</a> and <a href='misc/extras.html'>useful
   extras</a>.</p>

<h2>JPGs</h2>

<p>JPG images are good for photos.</p>

<img src='images/mochi.jpg'/>
GIF Images
GIFs are the preferred choice for straightforward animations, although they come with a limitation regarding color palette—avoid using them for photographs. Transparent pixels in GIFs are binary, meaning you cannot have partially transparent pixels. This limitation can pose challenges when aiming for intricate details on a transparent background. Consequently, if animation is not required, it is generally more advisable to opt for PNG images.

You can include this small image in our images.html file using the following code:
<h2>GIFs</h2>

<p>GIFs are good for animations.</p>

<img src='images/mochi.gif'/>
PNG Images
PNGs excel in applications that are not photographic or animated in nature. When it comes to photographs, a PNG file of comparable visual quality to the human eye would typically have a larger file size compared to an equivalent JPG file. Nonetheless, PNGs handle transparency seamlessly, and they do not impose constraints on color palettes. This makes them exceptionally well-suited for purposes like icons, technical diagrams, logos, and more.

Now, let's incorporate this PNG image into our sample project as well:
<h2>PNGs</h2>

<p>PNGs are good for diagrams and icons.</p>

<img src='images/mochi.png'/>
SVG Images
In contrast to the pixel-based image formats mentioned earlier, SVG is a vector-based graphics format, which means it can be resized to any dimension without sacrificing quality. This characteristic renders SVG images exceptionally useful for responsive design. They are suitable for nearly all the same purposes as PNGs, and you should opt for SVG whenever possible.

These images, initially sized at 100×100 pixels, have been expanded to 300×300 pixels, revealing a noticeable disparity between them. Observe the sharp, well-defined lines in the SVG image on the left, whereas the PNG image on the right exhibits significant pixelation.
Despite being in a vector format, SVGs can be employed in precisely the same manner as their raster counterparts. Feel free to include the mochi.svg image in our images.html page:
<h2>SVGs</h2>

<p>SVGs are <em>amazing</em>. Use them wherever you can.</p>

<img src='images/mochi.svg'/>
There is a potential challenge associated with SVGs: to ensure consistent display across different browsers, you must transform any text elements into outlines using your image editing software, such as Adobe Illustrator or Sketch. If your images include substantial amounts of text, as seen in the elaborate screenshots in this tutorial, this can significantly affect the file size. Due to this consideration, Quizzets.wgu.edu opts for PNGs over SVGs, despite the impressive capabilities of SVGs.
Image Dimensions
By default, the <img/> element adopts the inherent dimensions of its associated image file. In this case, our JPG, GIF, and PNG images are actually 150×150 pixels in size, while our SVG mochi is only 75×75 pixels.

As we'll explore in more detail in the Responsive Images section, for pixel-based image formats to appear as intended on retina displays, they need to be twice as large as the desired display size. To adjust our pixel-based images to the intended size of 75×75, we can utilize the "width" attribute of the <img/> element. In the images.html file, please modify all our pixel-based images to align with the following specifications:
<!-- In JPGs section -->
<img src='images/mochi.jpg' width='75'/>

            <!-- In GIFs section -->
<img src='images/mochi.gif' width='75'/>

            <!-- In PNGs section -->
<img src='images/mochi.png' width='75'/>
The "width" attribute establishes a specific dimension for the image, and there is also a corresponding "height" attribute available. When you set only one of these attributes, the image will proportionally scale, while defining both will result in stretching the image. It's important to note that dimension values are expressed in pixels, and you should refrain from including any units (e.g., using "width='75px'" would be incorrect).
While the width and height attributes can be beneficial, it's often more advantageous to establish image dimensions through CSS. This approach allows for adjustments using media queries, which we will delve into more comprehensively when we explore responsive design.
Text Alternatives
Incorporating alt attributes into your <img/> elements is considered a best practice. These attributes provide a "textual alternative" for the displayed image. This practice holds significance for search engines and benefits users who rely on text-only browsers, such as individuals using text-to-speech software due to visual impairments.
Revise all our images to encompass informative alt attributes:
<!-- In JPGs section -->
<img src='images/mochi.jpg' width='75' alt='A ball in a bubble'/>

            <!-- In GIFs section -->
<img src='images/mochi.gif' width='75' alt='A dancing ball'/>

            <!-- In PNGs section -->
<img src='images/mochi.png' width='75' alt='A ball'/>

            <!-- In SVGs section -->
<img src='images/mochi.svg' alt='A ball with Bézier handles'/>
For additional instances demonstrating the utilization of the alt attribute, you can consult the exceptionally comprehensive official specification.
More HTML Attributes
Now that we (ideally) have a strong grasp of HTML attribute syntax, we can apply a few final touches to our HTML boilerplate code. It's essential that every web page you create specifies the language in which it is written and its character encoding.
Document Language
The default language for a web page is established through the lang attribute located within the top-level <html> element. Since our document is in English, we will employ the "en" country code as the attribute value. Please apply this to all the pages we've generated:
<html lang='en'>
If you're uncertain about the country code for your language, you can find it by referring to the Subtag field in this resource.
Character Sets
A "character set" can be likened to a digital alphabet used by your browser. It differs from the language of your document because it exclusively influences the rendering of the individual letters, rather than affecting the language of the content. Let's experiment by copying and pasting some international characters into our misc/extras.html web page to observe the outcome.
<h2>Character Sets</h2>

<p>You can use UTF-8 to count in Turkish:</p>

<ol>
  <li>bir</li>
  <li>iki</li>
  <li>üç</li>
  <li>dört</li>
  <li>beş</li>
</ol>
Upon viewing this in a web browser, you'll notice some unusual characters in place of the ü, ç, ö, and ş characters:
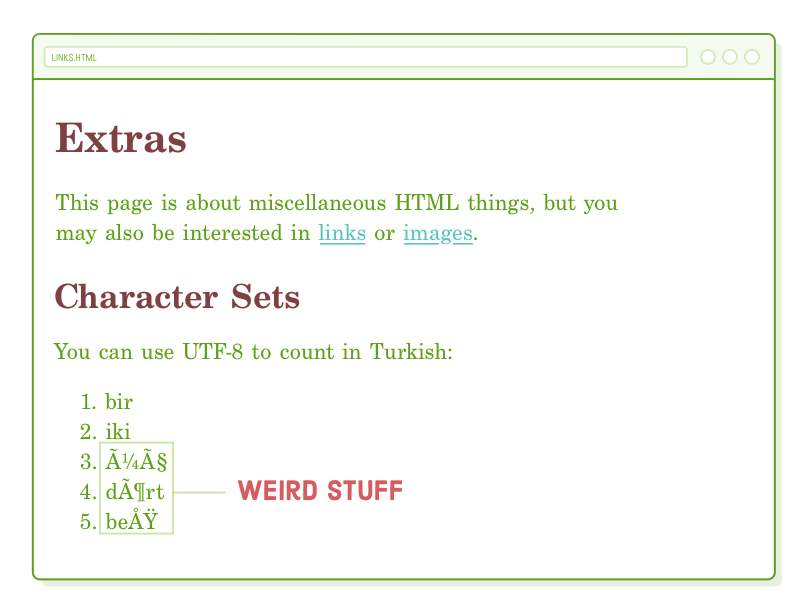
This occurs because the default character set in most browsers doesn't include these "special" characters. To resolve this issue, you can specify a UTF-8 character encoding by inserting a <meta> element with a charset attribute into the <head> section of our misc/extras.html file:
<meta charset='UTF-8'/>
The special characters should now display correctly. Nowadays, UTF-8 functions as a kind of universal alphabet for the Internet. Therefore, it's advisable to include this line in the <head> section of every web page you create.
HTML Entities
Alright, while this final section isn't directly related to links or images, there's one more topic to address before we transition into CSS. An "HTML entity" is a distinct character that cannot be represented as plain text in an HTML document. This often implies that the character is either reserved in HTML or you don't have a corresponding key on your keyboard for it.
Reserved Characters
The characters <, >, and & are referred to as "reserved characters" because they cannot be directly placed into an HTML document without undergoing encoding. This is due to their specific roles in the HTML syntax: < initiates a new tag, > concludes a tag, and, as we'll soon discover, & signals the use of an HTML entity.
Include the following content in misc/extras.html:
<h2>HTML Entities</h2>
<p>There are three reserved characters in HTML: < > and &. You
should always use HTML entities for these three characters.</p>
Entities consistently start with an ampersand (&) and conclude with a semicolon (;). Within this framework, you insert a specific code that your browser interprets as a symbol. In this instance, it interprets "lt" as a less-than symbol, "gt" as a greater-than symbol, and "amp" as an ampersand symbol.
There's an extensive array of HTML entities to explore. We'll let you delve into most of them independently.
Quotes
Curly quotes aren't obligatory, but if you have a penchant for typography, they will likely be among the most frequently employed HTML entities. There are four distinct variations of curly quotes: opening and closing single quotes as well as opening and closing double quotes.
- “
- ”
- ‘
- ’
You can substitute straight quotes (' and ") with curly quotes, like this:
<p>If you’re into “web typography,” you’ll also find
yourself using curly quotes quite a bit.</p>
In contrast to straight quotes, these curly quote entities should hug the text.
UTF-8 and HTML Entities
In the earlier days of the web, HTML files were restricted from containing special characters, rendering entities considerably more valuable. However, with the adoption of a UTF-8 character set, we should now be able to directly include any character in the HTML document. This shifts the primary utility of entities towards serving as reserved characters or for convenience when composing raw HTML.
Summary
A website essentially comprises a collection of HTML, image, and, as we'll soon explore, CSS files interlinked. Begin viewing a website as an elegant means for users to navigate through the folders and files we generate during the web development journey. With this perspective, it becomes evident that maintaining a well-structured file system is a pivotal element in website creation.
We've also gained knowledge about a couple of crucial attributes (lang and charset) that furnish us with the fundamental template to serve as the starting point for every web page you craft:
<!DOCTYPE html>
<html lang='en'>
  <head>
    <meta charset='UTF-8'/>
    <title>Some Web Page</title>
  </head>
  <body>
    <h1>Some Web Page</h1>
    <!-- Rest of the page content -->
  </body>
</html>
Yet, there's one significant component we haven't covered: CSS. In the upcoming chapter, we will explore additional HTML elements and attributes that enable us to apply CSS styles across our entire website. The skill of working with multiple files and intelligently linking them to one another will become even more crucial than it was in this chapter.