"Semantic HTML" is the concept that your HTML code should communicate the inherent meaning of your content, not just its visual presentation. While we've been practicing semantic HTML so far (like using <strong> instead of <b>), there's a specific group of elements known as "sectioning elements" that are dedicated to enhancing the structural meaning of a web page. These elements are designed to help organize content effectively and look something like this:
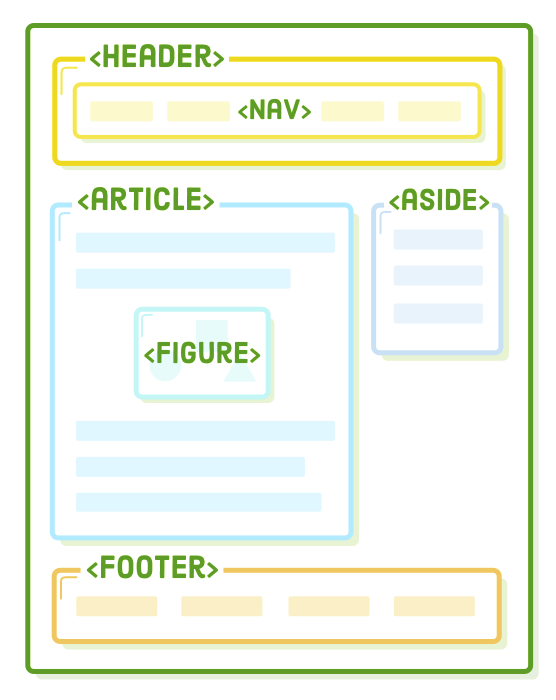
Opting for these sectioning elements instead of using <div> elements is a key practice in contemporary web development. It simplifies the process for search engines, screen readers, and other automated systems to recognize and categorize the various components of your website. Additionally, it contributes to better organization, aiding you as a developer in maintaining your site more efficiently.
In this chapter, we'll focus solely on HTML without delving into the box model, flexbox, or positioning techniques. Nevertheless, it's worth noting that you can still apply all the CSS rules you've learned in previous chapters to these new elements. Consider sectioning elements as akin to <div> elements, but with a specific purpose or meaning.
Setup
For this chapter's example, we'll start with a basic, unstyled HTML document. Begin by creating a new project folder named "semantic-html" and inside it, create a new file named "article.html." Then, insert the following code:
<!DOCTYPE html>
<html lang='en'>
  <head>
    <meta charset='UTF-8'/>
    <title>Semantic HTML</title>
  </head>
  <body>

    <h1>Demystified HTML & CSS!</h1>
    <ul>
      <li><a href='#'>Home</a></li>
      <li><a href='#'>About</a></li>
      <li><a href='#'>Blog</a></li>
      <li><a href='#'>Sign Up</a></li>
    </ul>

  </body>
</html>
The <h1> and <ul> elements likely represent the primary header and navigation menu for our website, serving as the banner or introductory section rather than the main content of the web page. While we haven't delved into this distinction previously, it's precisely the focus of this chapter.
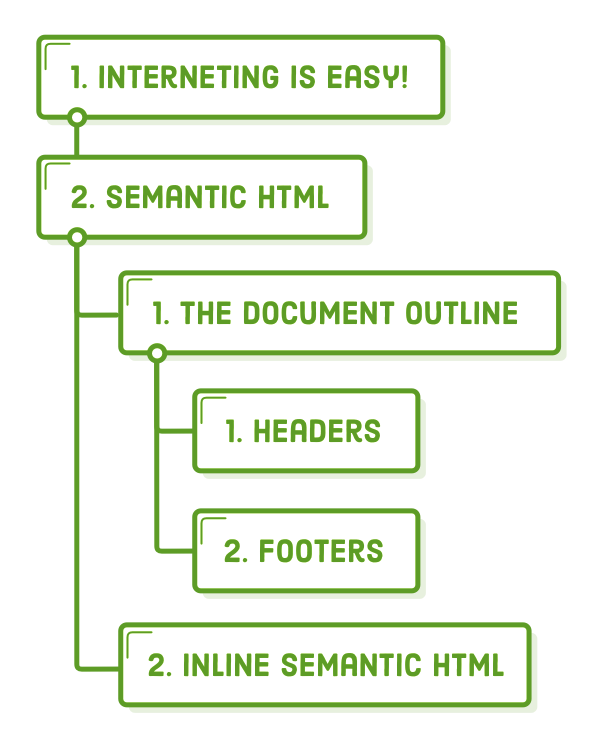
The Document Outline
Each HTML document features an "outline," which serves as the structural hierarchy of the content as perceived by search engines and screen readers. This outline is shaped by the presence and organization of heading elements, such as <h1> through <h6>. To illustrate this, let's explore it further by adding a mock blog post to our article.html file:
<h1>Semantic HTML</h1>
<p>By Bob Florence. Published September 22nd</p>
<p>This is an example web page explaining HTML5 semantic markup.</p>

<h2>The Document Outline</h2>
<p>HTML5 includes several “sectioning content” elements that
   affect the document outline.</p>

<h3>Headers</h3>
<p>The <code><header></code> element is one such sectioning
   element.</p>

<h3>Footers</h3>
<p>And so is the <code><footer></code> element.</p>

<h2>Inline Semantic HTML</h2>
<p>The <code><time></code> element is semantic, but it’s not
   sectioning content.</p>

<p>This fake article was written by somebody at Quizzets.wgu.edu.</p>
The HTML5 Outliner is a handy tool for examining the document's structural hierarchy on a web page. To use it, simply paste the entire content of article.html into the text field at the bottom. This will reveal the outline for our example, which currently exhibits the following structure. It's somewhat reminiscent of the outlines you might have learned to create for research papers back in elementary school.
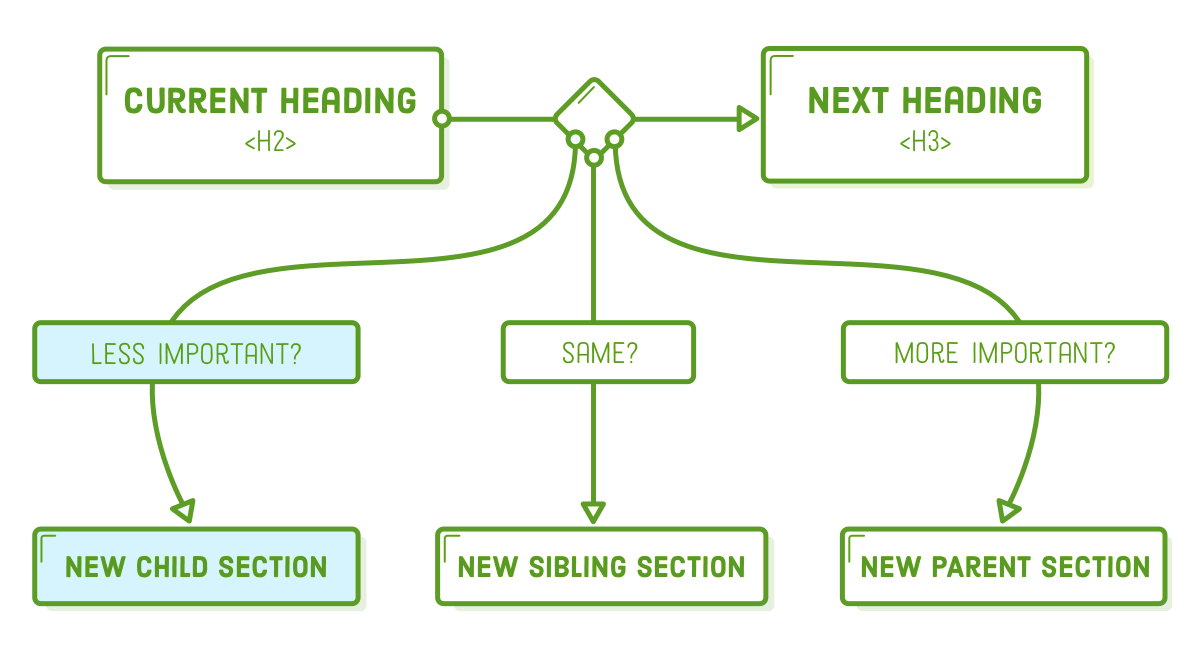
Every <h1> element establishes a new section within the document outline, and any headings of lower hierarchy that follow it are regarded as subsections beneath that primary heading. For instance, the "Semantic HTML" section contains two subsections: "The Document Outline" and "Inline Semantic HTML." The same hierarchical relationship applies to <h2>, <h3>, and subsequent heading elements, extending down to <h6>.
It's essential to understand that the specific value of the heading level isn't crucial; what matters is whether it's greater or lesser than the heading of the current section. For instance, if you change the <h3> headings to <h4> and then use the outliner tool once more, you'll notice that this modification doesn't impact the document outline because <h4> is still considered less prominent than the parent <h2>.
How does this document outline concept connect with semantic HTML? Well, headings are among the most semantic elements in a web page. They have a substantial impact on how search engines discern the significance of content on your web page. Furthermore, the semantic HTML elements we're about to delve into introduce additional meaning to, and at times, modify the default outlining behavior that we've discussed.
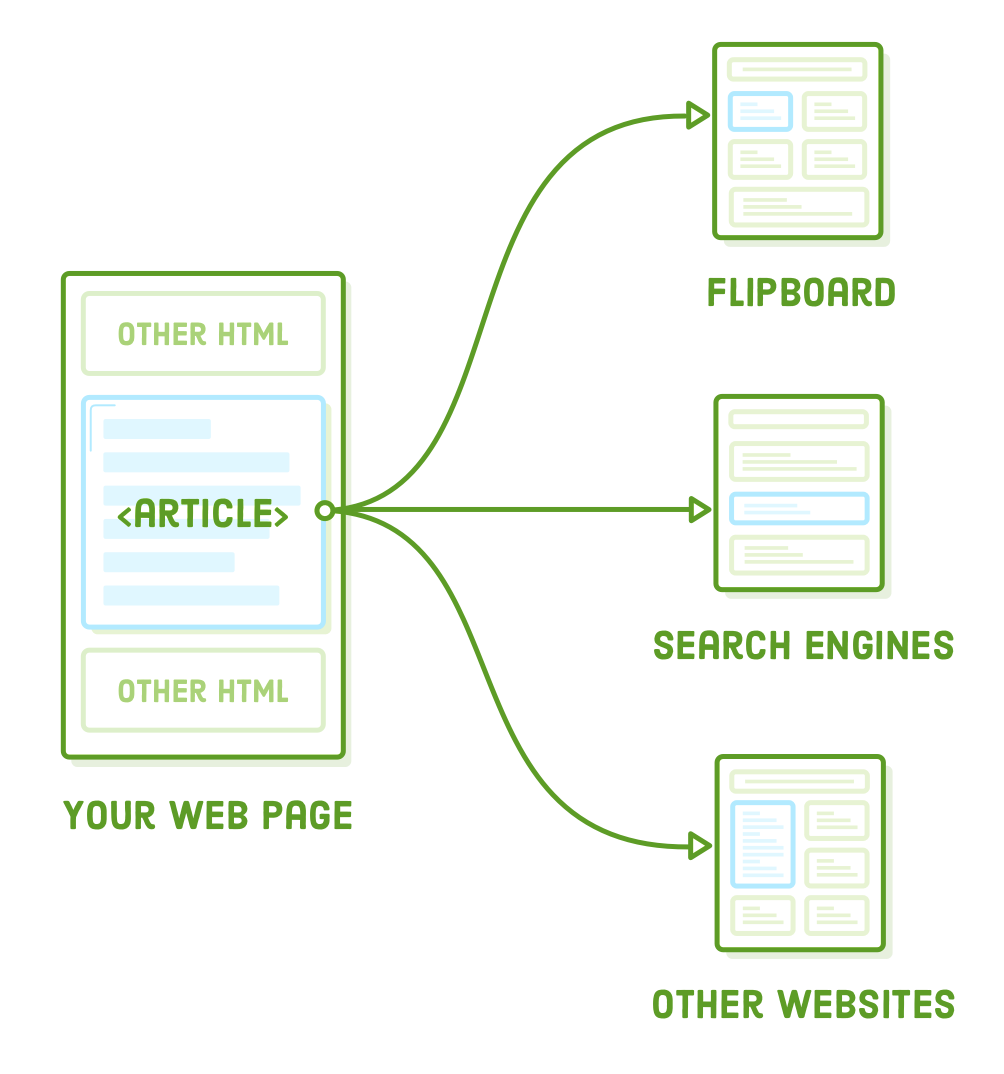
Articles
The <article> element signifies a self-contained article within a web page. It should encompass content that can be extracted from your page and presented in an entirely different context without losing its coherence. For example, an application like Flipboard should be able to extract an <article> element from your site, showcase it within its own app, and have it remain comprehensible to its users.
In our example, we can employ the <article> element to label the primary content of the page as an independent entity, like this:
<article>
  <h1>Semantic HTML</h1>
  <p>By Bob Florence. Published January 3rd</p>
  <p>This is an example web page explaining HTML5 semantic markup.</p>
    <!-- ... -->
  <p>This fake article was written by somebody at Quizzets.wgu.edu.</p>
</article>
Notice that we've kept the copyright notice outside the <article> element because it serves as a footer for the entire website, not exclusively for our article. As we'll soon explore, <article> elements function as miniature web pages within your HTML document. They possess their own headers, footers, and document outlines that are entirely separate from the rest of your site.
Using Multiple Article Elements
In cases such as blog posts, newspaper articles, or web pages dedicated to individual topics, there may typically be only one <article> element per page. However, it's entirely permissible to include multiple <article> elements on a single page. For example, a page that showcases several blog posts can enclose each post in its own set of <article> tags (you don't need to add this to our article.html page):
<article>
  <h1>First Post</h1>
  <p>Some content</p>
</article>
<article>
  <h1>Second Post</h1>
  <p>Some more content</p>
  <h2>Subsection</h2>
  <p>Some details</p>
</article>
<article>
  <h1>Last Post</h1>
  <p>Final bit of content</p>
</article>
This indicates to anyone viewing our page that there are three separate articles available for syndication. You can think of it as a method for consolidating multiple HTML files into one document without causing confusion for search engines, browsers, or other machines attempting to analyze our content.
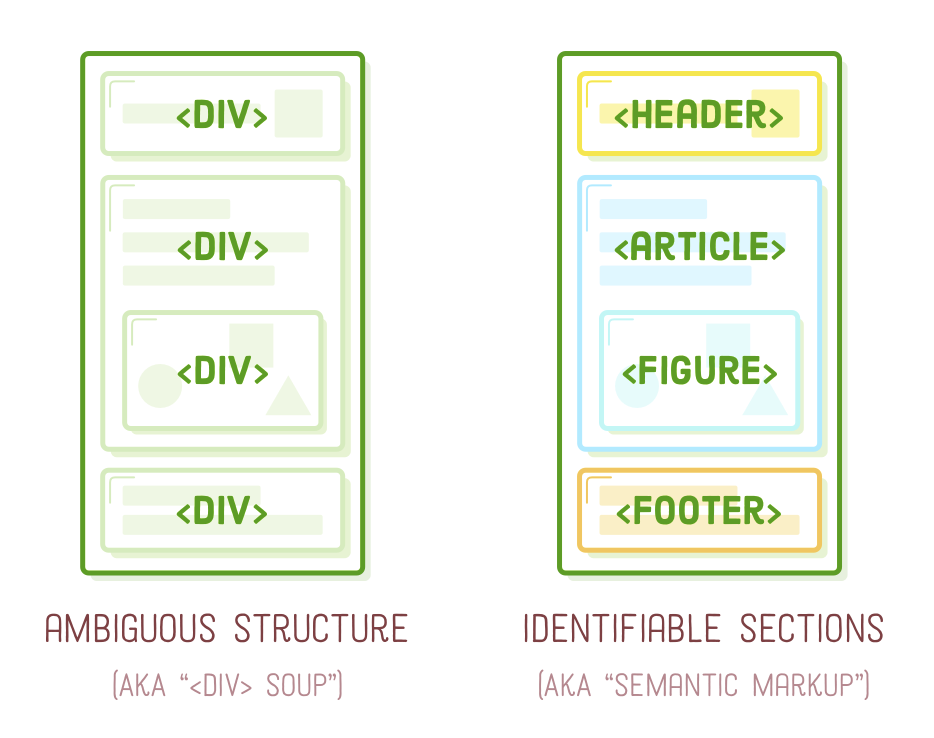
When you contrast this with a collection of generic <div> elements sporting random class names, you can start to appreciate how semantic HTML significantly enhances the navigability of the web.
Sections
The <section> element is somewhat akin to an <article>, but it doesn't require the same level of self-contained independence. In other words, apps like Flipboard wouldn't attempt to extract all the <section> elements from your page and present them as standalone content pieces.
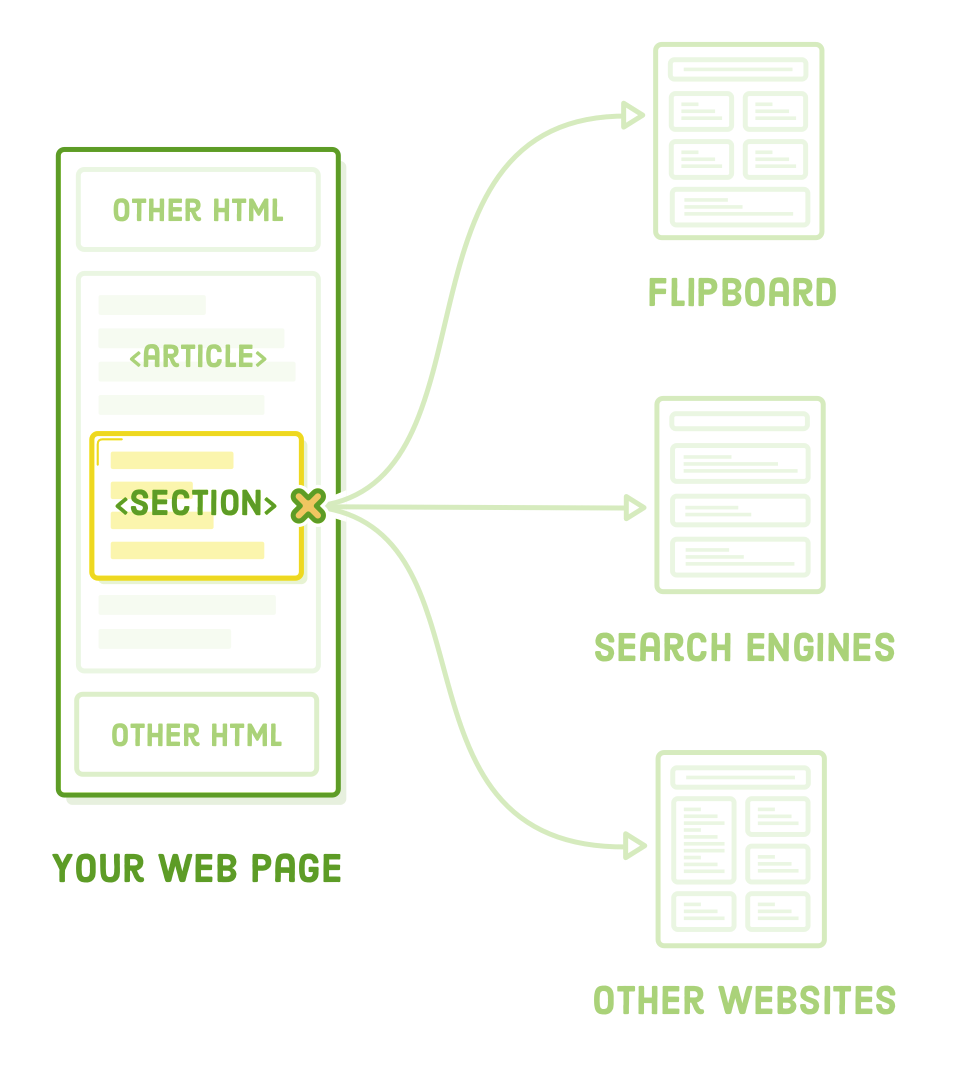
Consider <section> as a deliberate means of delineating sections within a document outline. Why would we opt for this instead of relying solely on heading levels to structure the outline? Well, frequently, you require a container to encapsulate a section for layout considerations, and employing the more descriptive <section> element is more meaningful than a generic <div>.
Let's section off two portions of our article.html file:
<section>     <!-- Add this -->
  <h2>The Document Outline</h2>
  <p>HTML5 includes several “sectioning content” elements that
     affect the document outline.</p>

  <h3>Headers</h3>
  <p>The <code><header></code> element is one such sectioning
     element.</p>

  <h3>Footers</h3>
  <p>And so is the <code><footer></code> element.</p>
</section>    <!-- And this -->

<section>     <!-- This too! -->
  <h2>Inline Semantic HTML</h2>
  <p>The <code><time></code> element is semantic, but it’s not
     sectioning content.</p>
</section>    <!-- Don't forget this -->
This preserves the structure of our document outline while adding semantic clarity and providing a convenient point for applying CSS styles, such as defining a background color for a specific section.
<SECTION> and the Document Outline
The previous modification also has an intriguing impact on how our headings implicitly create sections. Observe what occurs when we lower the heading level of the second <h2>:
<section>
  <h6>Inline Semantic HTML</h6>     <!-- Change this heading level -->
  <p>The <code><time></code> element is semantic, but it’s not
  sectioning content.</p>
</section>
The <h6> is positioned lower in the hierarchy than the preceding <h3>, which might lead you to anticipate it becoming part of the Footer section. However, this is not the case: the document outline remains unchanged from before.
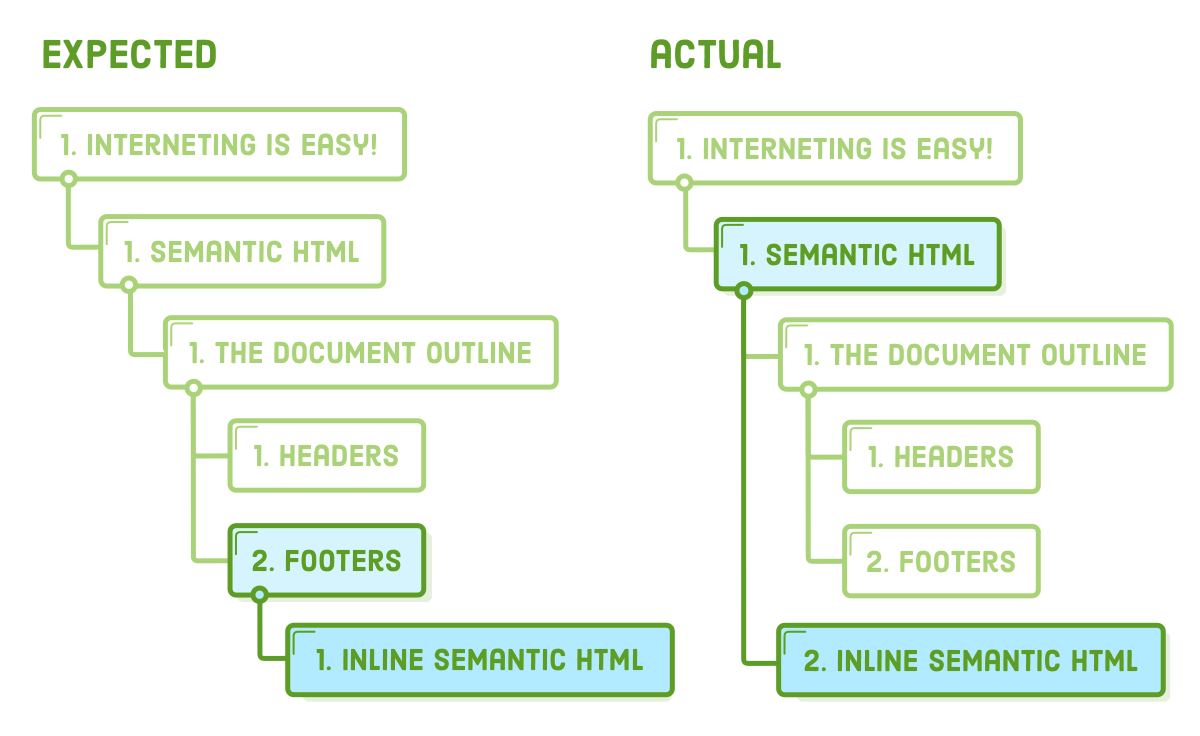
By incorporating those <section> elements, we're instructing the document outline to rely on the nesting arrangement of the <section> elements instead of the heading levels. Essentially, this implies that each <section> can possess its distinct set of <h1> through <h6> headings, which are isolated from the remainder of the page.
Nonetheless, it's not advisable to employ the <section> element for the purpose of altering the document outline in this manner. This is due to the fact that browsers, screen readers, and certain search engines may not accurately interpret the impact of <section> on the document outline. Instead, it's best practice to establish a page's outline by utilizing heading levels and to utilize <section> primarily as a substitute for container <div> elements when it fits the context.
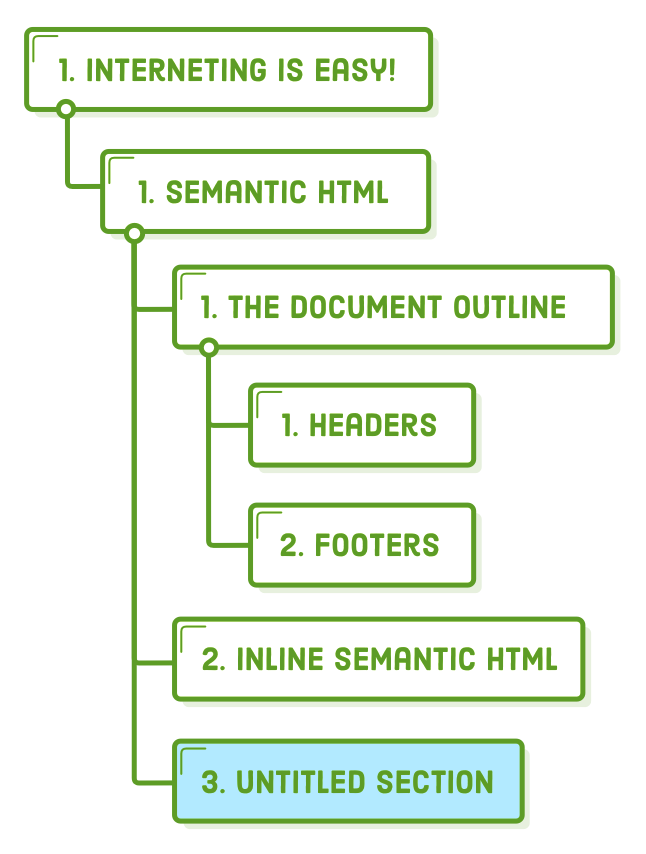
Additionally, it's essential to be aware that each <section> element should incorporate at least one heading; otherwise, it will introduce an "untitled section" into your document outline. To illustrate this, you can modify article.html as shown below and then reevaluate it using the outliner tool:
<h2>Inline Semantic HTML</h2>
<section>
  <!-- This will be an "Untitled Section" -->
  <p>The <code><time></code> element is semantic, but it’s not
  sectioning content.</p>
</section>
This action generates a new section; however, because there's no accompanying heading, the document outline can't assign a name to it. It's generally advisable to steer clear of such situations when utilizing <section> elements.
According to the HTML5 specification, <section> is a rather generic element. Additionally, its role in document outlines is not always properly interpreted by browsers and screen readers. This can make it challenging to determine when and how to use it effectively. Our recommendation is to utilize <section> primarily as a more descriptive replacement for <div> elements that wrap the implicitly defined sections of your page. Avoid using it for self-contained content (which is the purpose of <article>) or purely for layout purposes.
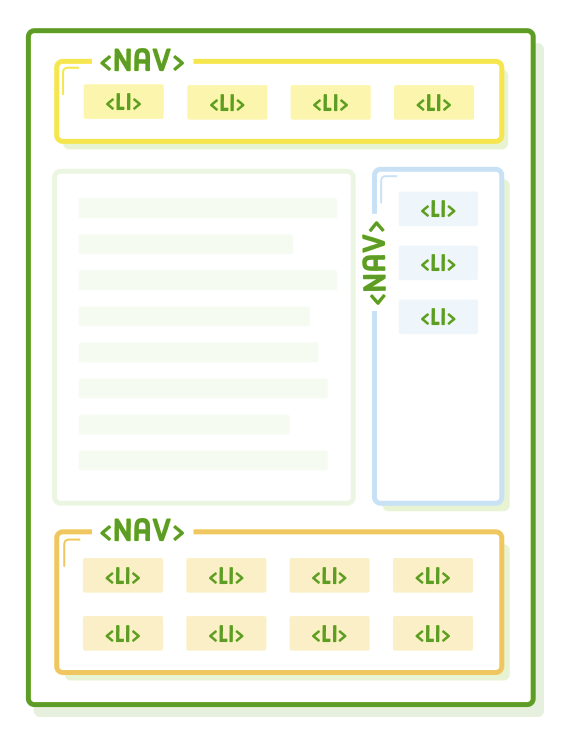
Nav Elements
The <nav> element allows you to structure the different navigation sections of your website. This includes the primary site navigation, links to related pages in a sidebar, table of contents, or any collection of links. For instance, it's a good practice to enclose our site-wide navigation menu within a <nav> element:
<h1>Demystified HTML & CSS!</h1>
<nav>                                    <!-- Add this -->
  <ul>
    <li><a href='#'>Home</a></li>
    <li><a href='#'>About</a></li>
    <li><a href='#'>Blog</a></li>
    <li><a href='#'>Sign Up</a></li>
  </ul>
</nav>
This provides valuable semantic information for search engines, aiding them in swiftly grasping the organization of your entire website, which in turn facilitates the discovery of other pages. As we'll explore in the Asides section, it's even possible to incorporate multiple <nav> elements on a single page to accommodate different sets of related links.
Headers
The <header> element introduces a fresh layer of semantic structure, distinct from headings (the <h1>-<h6> elements). It signifies the preliminary content for a section, article, or the entirety of a web page. "Introductory content" encompasses a wide range of items, including your company's logo, navigation aids, or author details.
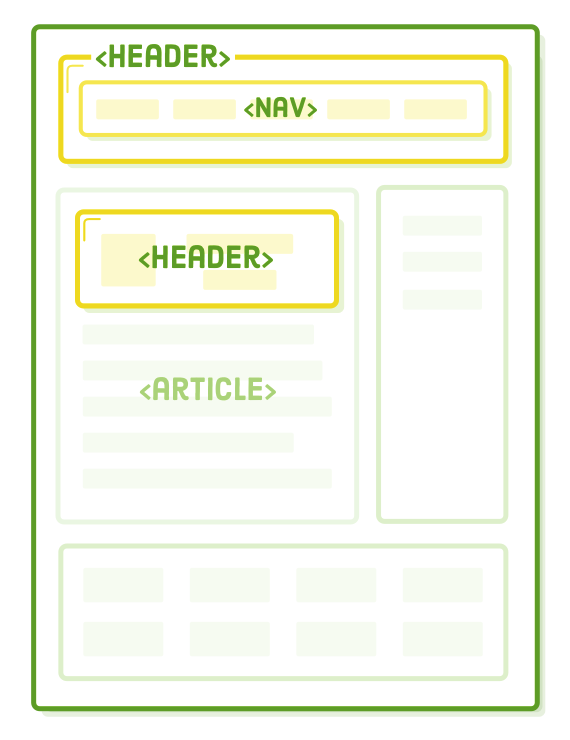
A recommended practice is to enclose a website's name/logo and primary navigation within a <header>. Let's proceed and incorporate one into our sample project:
<header>
  <h1>Demystified HTML & CSS!</h1>
  <nav>
    <ul>
      <li><a href='#'>Home</a></li>
      <li><a href='#'>About</a></li>
      <li><a href='#'>Blog</a></li>
      <li><a href='#'>Sign Up</a></li>
    </ul>
  </nav>
</header>
Headers are contextually linked with the closest sectioning element, which is typically a <body>, <section>, or <article> element. Consequently, you can employ multiple <header> elements to introduce content in various segments of a document. For instance, consider adding another <header> to include the title, author, and publication date of our <article>:
<article>
  <header>
    <h1>Semantic HTML</h1>
    <p>By Bob Florence. Published September 22nd</p>
  </header>

  <p>This is an example web page explaining HTML5 semantic markup.</p>
    <!-- ... -->
In the absence of this <header>, search engines and screen readers wouldn't distinguish the first <p> as distinct from the main article content. Additionally, it provides a handy CSS target, as blog post titles and author information are often styled differently than the article's body. So, consider <header> as a more semantically meaningful replacement for a <div> container.
Footers
In essence, footers share a similar role with headers but are typically positioned at the conclusion of an article or website rather than the beginning. Common applications include items such as copyright statements, navigation in the footer, and author profiles at the end of blog posts.
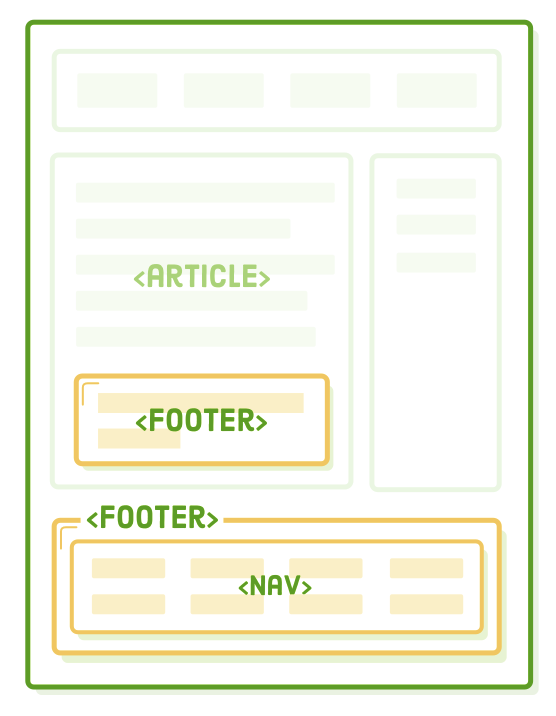
Footers function similarly to <header> elements in that they are linked to the closest sectioning element. Therefore, we can apply them to our webpage's copyright notice and the author details within our <article>. Incorporate the following two footer elements into our article.html page:
<article>
  <header>
    <h1>Semantic HTML</h1>
    <p>By Bob Florence. Published September 22nd</p>
  </header>

  <p>This is an example web page explaining HTML5 semantic markup.</p>
    <!-- ... -->

  <footer>         <!-- Add this -->
    <p>This fake article was written by somebody at Quizzets.wgu.edu</p>
  </footer>        <!-- And this -->

</article>

<footer>           <!-- This, too -->

</footer>          <!-- Don't forget to close it! -->

</body>
</html>
The <footer> within the <article> pertains specifically to the content of that article, which is appropriate since it contains the author's biography. In contrast, the second footer is associated with the entire page.
Asides
Headers and footers serve to augment an article with additional information. However, there are instances where we need to exclude certain information from an article. For example, a sponsored blog post might include an advertisement related to the sponsoring company, but we typically wouldn't want to consider it part of the article's main text. This is where the <aside> element comes into play.
Let's incorporate a mock advertisement into our article.html file, positioned just below the header of the article:
<article>
  <header>
    <h1>Semantic HTML</h1>
    <p>By Bob Florence. Published September 22nd</p>
  </header>
    <!-- Look! A fake advertisement! -->
  <aside class='advert'>
    <img src='some-advert-image.png'/>
  </aside>

  <p>This is an example web page explaining HTML5 semantic markup.</p>
Despite being contained within the <article> element, it's clear to machine readers that the image is only loosely connected to the article's content. Besides advertisements, the <aside> element is suitable for emphasizing definitions, statistics, or quotes. If something appears visually distinct from the rest of the article, it's likely to be considered an aside.
When employed outside of an <article> element, <aside> is linked to the entire page, similar to <header> and <footer>. This makes it a suitable choice for structuring a site-wide sidebar. Insert the following code below the closing </article> tag, just before the second <footer>:
<aside class='sidebar'>
  <h2>Sidebar</h2>
  <p>Some sidebar content</p>
  <nav>
    <h3>HTML & CSS Tutorial</h3>
    <ul>
      <li><a href='#'>Introduction</a></li>
      <li><a href='#'>Basic Web Pages</a></li>
      <li><a href='#'>etc...</a></li>
    </ul>
  </nav>
  <nav>
    <h3>JavaScript Tutorial</h3>
    <ul>
      <li><a href='#'>Introduction</a></li>
      <li><a href='#'>Hello, JavaScript</a></li>
      <li><a href='#'>etc...</a></li>
    </ul>
  </nav>
</aside>
Take note of the class attributes in both of these examples. If our focus were on CSS in this chapter, we could apply the same styling to our <aside> elements as we have done with all the <div> elements we've used throughout this tutorial. This leads us to...
DIVs for Layout
Whenever possible, opt for semantic HTML as it aids machines in understanding the structure of your content and provides you with a consistent vocabulary for structuring your web pages. However, there may be occasions when you require a container element, and none of the semantic HTML elements we've discussed fit the context. In such cases, using a simple <div> solely for layout purposes is perfectly acceptable.
For example, if we intend to center our page using the well-known auto-margin method, we need to enclose the entire page within a container. Since this is purely for presentation purposes, using a <div> is the most suitable choice:
<body>
    <div class='page'>             <!-- Start of container div -->
      <header>
        <h1>Demystified HTML & CSS!</h1>
        <nav>
          <ul>
            <li><a href='#'>Home</a></li>
            <li><a href='#'>About</a></li>
            <li><a href='#'>Blog</a></li>
            <li><a href='#'>Sign Up</a></li>
          </ul>
        </nav>
      </header>
        <!-- ... -->
      <footer>

      </footer>
    </div>                         <!-- End of container div -->
  </body>
</html>
This is especially important in the context of flexbox, where numerous <div> elements are often necessary to properly group flex items. While at times, <section> or <nav> elements might be suitable for organizing these flex items, it's quite common to encounter a collection of <div> elements primarily used for presentation in a flexbox layout.
The key takeaway here is to avoid using semantic elements without a clear purpose. Using them incorrectly can be more detrimental than not using them at all, so when in doubt, it's better to opt for a <div> element.
Dates and Times
Machines often struggle with interpreting the various ways humans express dates and times, which can lead to errors. That's where the <time> element comes into play. It provides a structured and unambiguous way to represent dates and times in HTML.
The <time> element serves as a means to represent either a specific time of day or a particular calendar date. By using this element to present machine-readable dates, it allows web browsers to potentially link these dates to users' calendars and assists search engines in recognizing and processing specific date information.
To ensure the publication date of our article is clear and unambiguous, we can enclose it within <time> tags like so:
<article>
  <header>
    <h1>Semantic HTML</h1>
    <p>By Bob Florence. Published <time datetime='2023-9-22'>September
       22nd</time></p>
  </header>
    <!-- ... -->
The machine-readable date is specified in the "datetime" attribute. You can remember the date format as going from the largest time period to the smallest: year, month, and then date. It's worth noting that even though the year isn't explicitly mentioned in the human-readable text, including it in the "datetime" attribute informs search engines that our article was published in 2023.
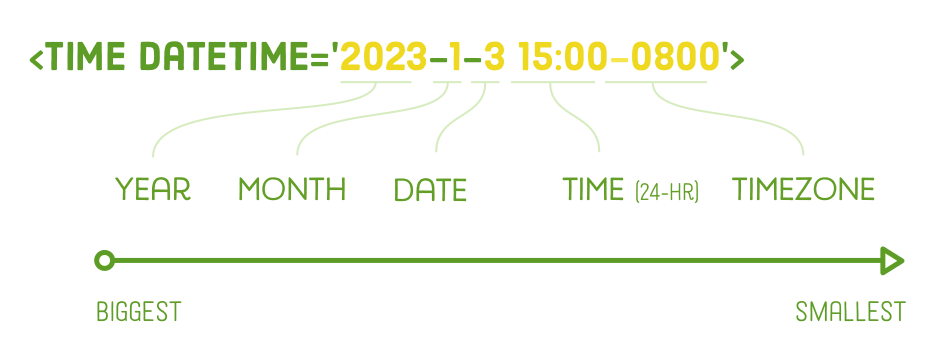
You can also include times and time zones within the "datetime" attribute. If we wanted to add a 3:00pm PST time to our publish date, it would look like this:
<time datetime='2023-1-3 15:00-0800'>September 22nd</time>
The time itself is in 24-hour format, and the "-0800" represents the time zone offset from GMT, which in this case, is for Pacific Standard Time.
Address
The <address> element, similar to <time>, doesn't affect the document's overall structure. Instead, it adds metadata to the parent <article> or <body> element, specifically for contact information related to the article's or web page's author. It's important to note that <address> is not meant for arbitrary physical addresses.
For example, let's consider adding the author's email address to the footer of our article:
<footer>
  <p>This fake article was written by somebody at Quizzets.wgu.edu, which
     is a pretty decent place to learn how to become a web developer. This footer
     is only for the containing <code><article></code> element.</p>
  <address>
    Please contact <a href='mailto:bobflorence@example.com'>Bob
    Florence</a> for questions about this article.
  </address>
</footer>
By default, this will be styled similarly to <em>, but you can modify this with a straightforward CSS rule. Additionally, take note of the updated email link in the href attribute, which you can find more information about on w3schools.com.
Figures and Captions
Finally, we have the <figure> and <figcaption> elements. The <figure> element represents a self-contained item, such as a diagram, illustration, or code snippet. The <figcaption> element is not mandatory but can be used to link a caption to its parent <figure> element.
Both of these elements are often employed to provide visible descriptions for <img/> elements within an article, as shown below:
<section>
  <h2>The Document Outline</h2>
  <p>HTML5 includes several “sectioning content” elements that
    affect the document outline.</p>

  <figure>
    <img src='semantic-elements.png'
         alt='Diagram showing <article>, <section>, and <nav> elements'/>
    <figcaption>New HTML5 semantic elements</figcaption>
  </figure>
    <!-- ... -->
The alt attribute is closely connected to the <figcaption> element. The alt attribute's purpose is to act as a textual substitute for the image, whereas <figcaption> provides additional information displayed alongside either the image or its text-based counterpart.
By utilizing <figcaption> as described above, you can omit the alt attribute of an image without negatively impacting your SEO. Depending on the nature of the images you're dealing with, it might be more practical (and less repetitive) to have visible <figcaption> elements that provide descriptions rather than using invisible alt attributes.
CSS/Legacy Considerations
Lastly, let's touch on legacy browsers. The semantic HTML elements discussed in this chapter were introduced in HTML5. While all modern browsers automatically recognize them without any additional effort, you might frequently encounter something similar to the following in global CSS stylesheets:
section, article, aside, footer, header, nav {
  display: block;
}
This causes the new semantic elements to function similarly to <div> elements in legacy browsers, where they act as block boxes rather than inline boxes.
Summary
Using CSS to define visual styles is how we communicate a web page's structure to humans. However, by structuring it with HTML sectioning elements like <header>, <article>, <figure>, and others, we also convey these visual styles to machines.
To grasp the significance of this, it's essential to consider the perspective of the machines that parse our content. Prior to the adoption of semantic HTML, developers relied on numerous <div> elements with varying and somewhat arbitrary class names to establish their page structure. For instance, consider these as potential names for a site-wide header:
<div class='main-menu'>
<div class='top-nav'>
<div class='top-banner'>
<div class='header'>
In the past, machine readers had to decipher the various <div> elements and more as part of their task. The new semantic HTML elements we've explored in this chapter can be likened to standardized labels for these class names. Now, they can simply search for a <header> element. While we can still include any class name for styling, search engines and screen readers now have a consistent method to recognize headers across all HTML5 websites on the internet.
The semantic elements we discussed in this chapter represent the best practices for contemporary websites. However, it's important to note that they only begin to tap into the additional layers of meaning you can incorporate into your web pages. Just to get started:
- Schema.org microdata enables you to modify how your site appears in search engine results.
- X (a.k.a. Twitter) cards determine the presentation of your web page within tweets.
- Open Graph metadata modifies how your content is displayed when shared on Facebook.
This topic delves deeper into the technical aspects of SEO, so we'll let you explore it independently. In the following chapter, we'll shift our focus once more and introduce another vital element of websites, particularly for e-commerce sites: forms.